Author:

This article is based up on my GitHub Repo and it describes the template I created for .NET the motivation for it and what comes after that.
I tried to do a series of articles before this one where I described the implementation of IdentityServer but it didn’t go that well, mostly because I didn’t have much time to write it and it came up short, I only did one article in that series.
This motivated me to write this one, but I didn’t want a classical article.
I wanted an article that will describe the repo, but at the same time provide opportunity for me to get feedback on the implementation choices I made, because let’s face it no one is perfect and everyone makes mistakes and I would like to get some issues on the Repo so we all can work on it and make it better.
So this article will describe what has been implemented and what features and improvements we will try to make in the future.
This project was developed using VS Code and VS Code only, so the whole tooling was adjusted to fit the need’s of VS Code so it can seamlessly work with the other tools.
One of the main goals for me was to setup hot reload with Docker Compose and .NET cli, because one of the most important thing for me is to debug in a containerized environment, abstracting the system dependencies that every computer has and mostly giving everyone the same development experiences.
For that I crate the Compose script and Dockerfile for debugging and what it does every time when a change has been made it hot reloads the app, so you don’t need to bother to rerun it every time, it utilizes dotnet watch inside the container.
When working in bigger Teams code formatting is very important and for .NET in VS Code I didn’t find good solutions, like Prettier.
I found a work around using the Csharper library and in the README you can find the implementation details, long story short, we utilize csharper which formats the code similar to Prettier, but you manualy need to run a command, for that we installed Run on Save, a VS Code extension which will run csharper to format our Code.
The whole solution was structured with the CLEAN Architecture in mind, and the solution has 4 projects:
To not go down into it, as you already know from the CLEAN Architecture, each Project has it’s own responsibilities.
If you don’t need the whole Solution preconfigured with Identity and IdentityServer you can utilize our setup script which will initialize a clean Solution without any implementation, you can read about it more in the README.
In development you want your migrations to be easily applied through code, this implementation is done but only in development, for any other environment you want your migrations to be applied manually, for that I also added scripts for adding the migrations and applying them, the implementation details are available here.
Because we are not using Visual Studio and have Nginx as our gateway to the api we needed SSL certificates for everything to work fine, so I created those and they are generated using the certificates.sh script when running docker compose, you can see the implementation details here.
The repository has implemented Identity for managing User but the actual Auth is deferred to IdentityServer, so you can use this implementation as your actual Authorization Server, currently it is not production ready but it will be in the future.
I won’t go into the details about the whole code implementation here for that you can use the article I wrote before where I describe the details and provide references to the resources.
I implemented the endpoints for:
You can modify the behaviour of ASP.NET Core Identity in IdentityConfiguration.cs here you have access to:
I implemented oAuth 2 with IdentityServer so if you need too, you can use this repository as your main Authorization Server, additional features will be added in the future, like the integration with External Auth Providers.
Curently you can view the documentation when you go to:
https://localhost/.well-known/openid-configuration
To reconfigure the Resources, Clients and Scopes go to IdentityServerResourceConfiguration.cs you can add your custom clients and configure the resources to your needs.
To Customize the IdentityServer behaviour, go to IdentityServerConfiguration.cs, here you can configure the DbContext’s (PersistedGrant and Configuration), type of the Identity User, Profile Service and many more things.
We have done everything at this point but one issue still remains and you won’t detect it until you try to authorize with your issued token.
The issue is with the Token Issuer. When you access the Discovery Document over the Browser you will see that the Issuer is localhost, which is correct, and the token you’ll get issued will be with that Issuer.

But when you try to access an Authorized endpoint you’ll get 401 Unauthorized because your Issuer is not valid:

This issue happens because when you Access the Discovery Document over the Browser and IdentityServer automatically inherits the Issuer from the url.
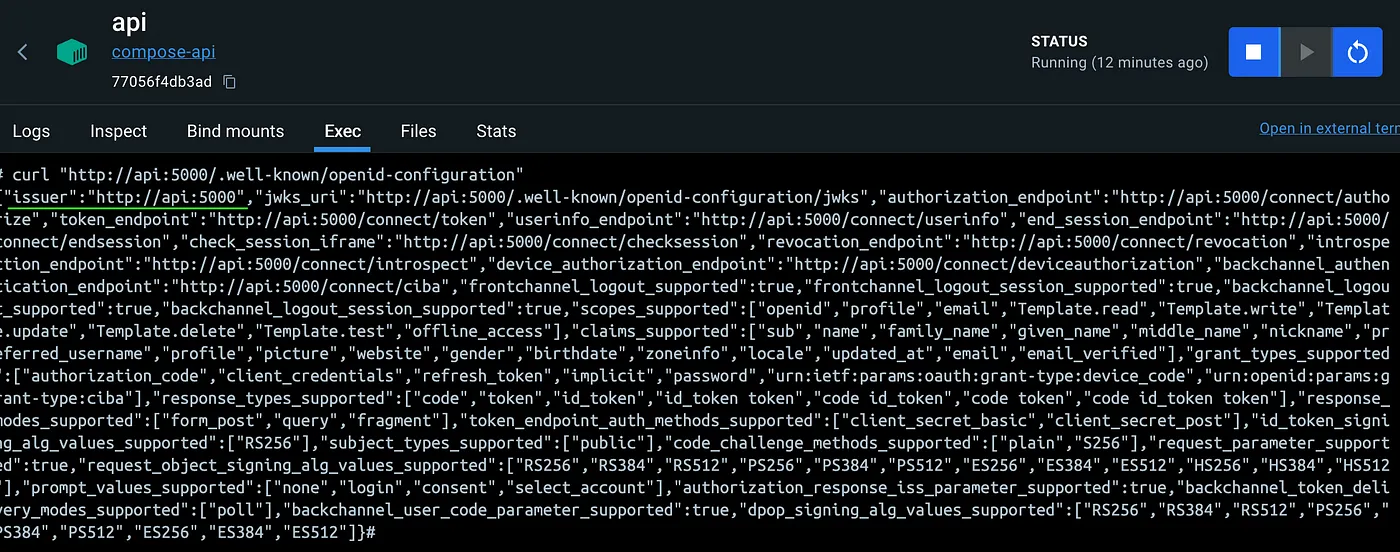
But when the Authorization Middleware need’s to validate the Token it will request the Discovery Document from inside the Container. As we defined in the compose file our service is called api and it is exposed on port 5000.
So to get the Discovery Document we need to call http://api:5000/.well-known/openid-configuration, this also means that the Issuer will be inherited from the url and it won’t be the same as our token.
Now to fix this issuer you’ll need to set two properties. First is the Issuer, and you will set that in the IdentityServerConfiguration.cs. You will set the IssuerUri to your actual Url (example http://localhost):
options.IssuerUri = settings.IdentityServerConfig.IssuerUri;
Once these two are configured even in the containerized environment your Issuer will be localhost and your token will be Valid. Now when you make a curl request from the container you will get the same Issuer as you would when you access it from the Browser:

This is just the begining of this Template Repository because in the future I plan on to expanding with improvements, fixes and adjustments, there are alreeady issues created, so if you want to contribute you can do so.
If you have suggestions, ideas or simply want to contribute to the Repository feel free to do so.
Author: