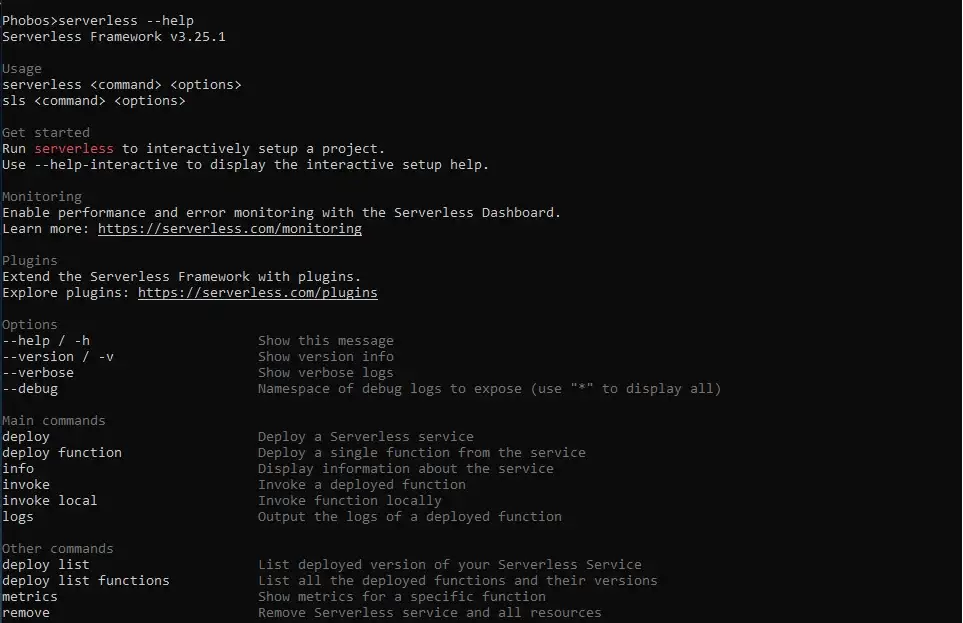
 List of commands
 Our Lambda function
 Setting up tests
 Our recently deployed code
 Initialized NPM project
 Default package.json file
 Serverless Offline commands
Author:

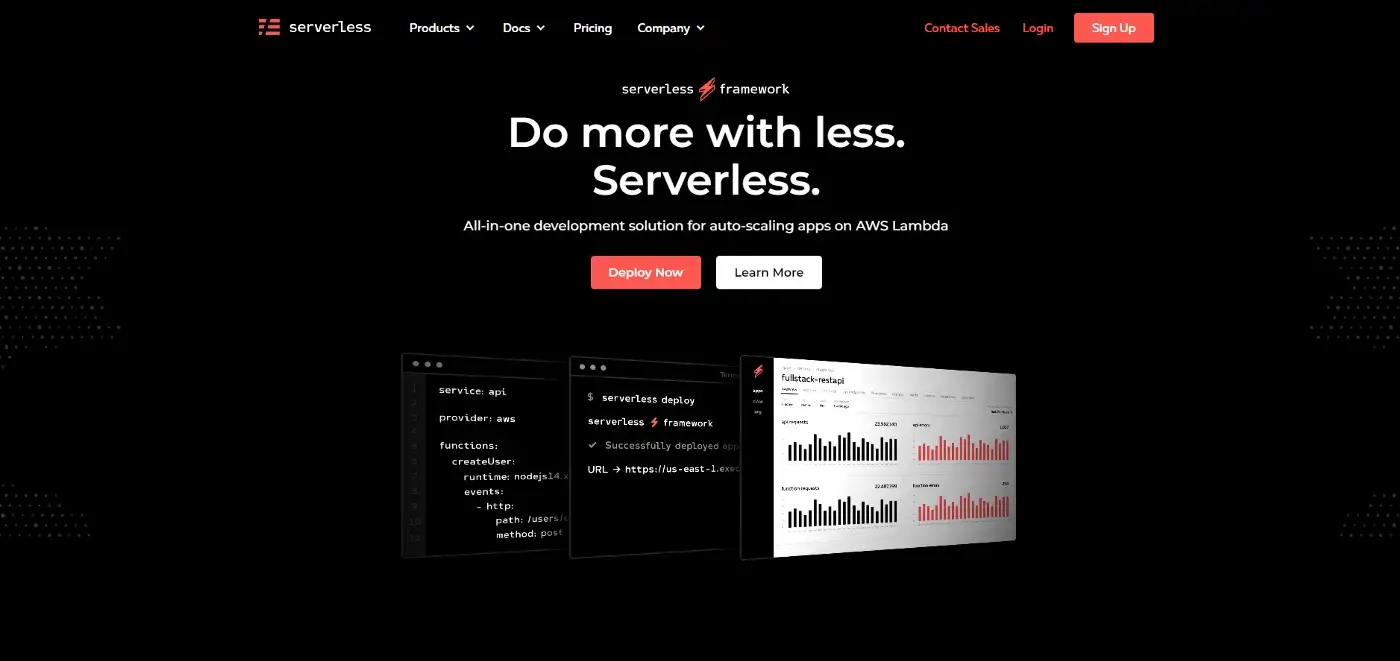
This guide will teach you how to develop, test, and deploy AWS Lambda function using Serverless Framework and also get familiar with Identity Access Management (IAM), CloudFormation, S3 Bucket, API Gateway, CloudWatch, and other cool services.

For this demonstration, we’ll be using Node.js for its simplicity, low Cold Starts, and huge ecosystem
(npm) of tools available to us.
We’ll learn how to create APIs, enable CORS, run Serverless offline, handle errors, use middlewares,
integrate with TypeScript, and set up production continuous deployment and monitoring.
You can get the full code on my GitHub.
. . .
Serverless computing is a method of providing backend services on an
as-used basis. A Serverless provider allows users to write and deploy code without the hassle of
worrying about the underlying infrastructure.
As developers, we only care about the code we write, while the servers are scaled and managed by the
cloud providers.
The usual setup of Lambda functions in AWS is manual.
What Serverless Framework allows us to do is write all of the manual steps as the Infrastructure as a
Code (IAAC) as well as easily manage resources and deploy our functions.
Some characteristics of Lambda functions:
The beauty of the Serverless Framework is that it is not exclusive to AWS. It supports multiple cloud providers including Azure, GCP, AWS, etc, as well as several languages like Python, Node.js, C#, Java and other.
Make sure you have an AWS account, AWS-CLI and Node.js installed on your machine. You can verify the latter by running aws --version & node -vin your terminal.
 Illustration created by
AllCode
Illustration created by
AllCode
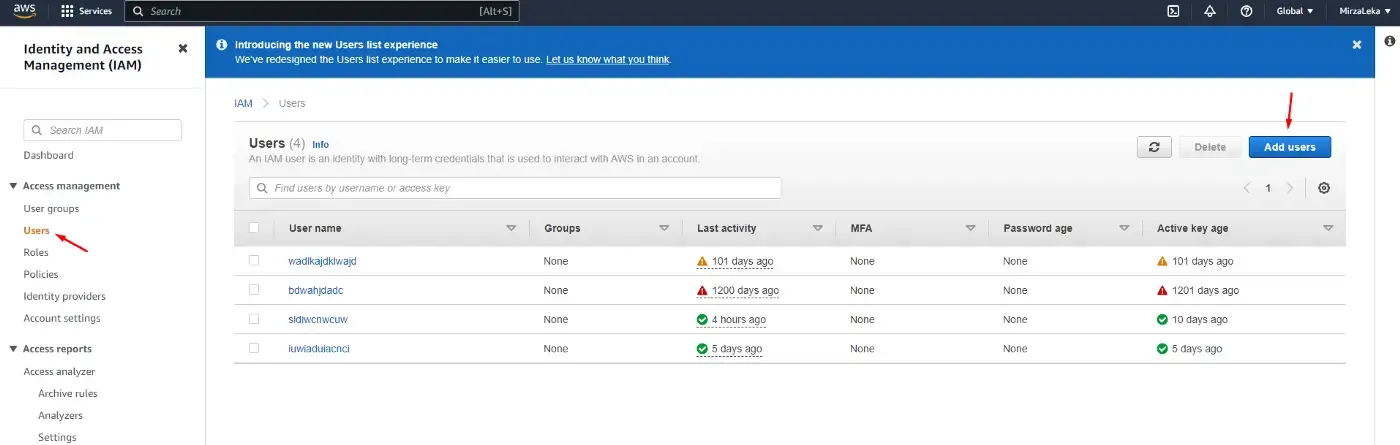
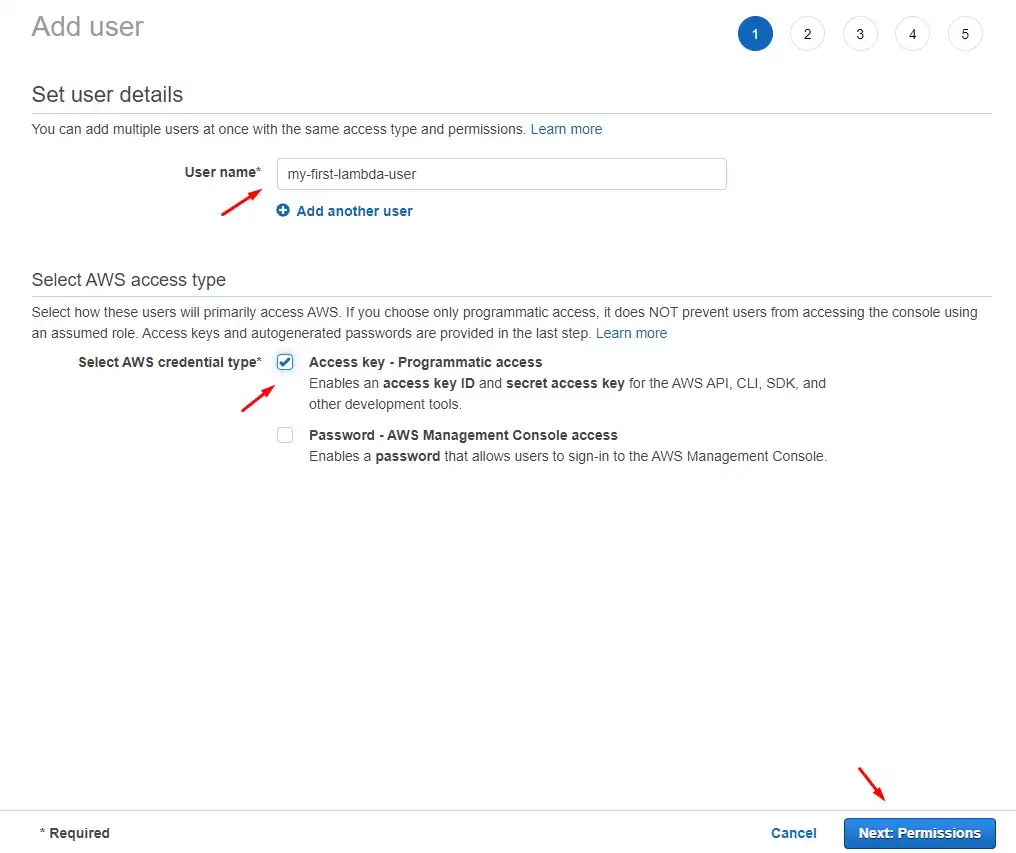
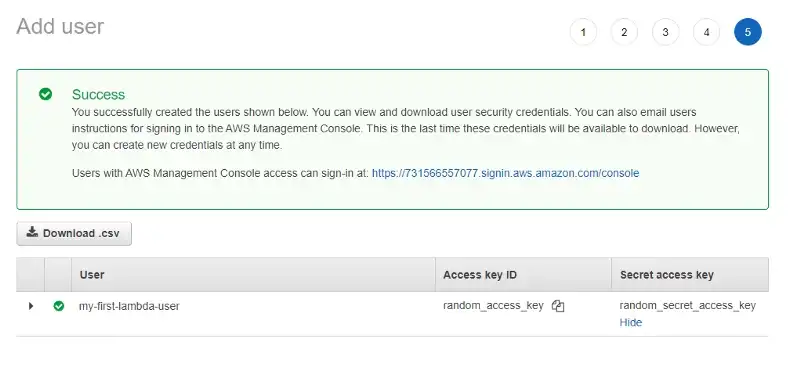
To kick things off, we need to do is generate permissions for our Lambda User.
Step 1: We sign in to your AWS account and search for IAM.
Step 2: Click on the Users (under Access Management) in the sidebar on the left, then click on the Add users button to the right.
Step 3: On the next screen enter the user name (any name we want) and click on the Access key — Programmatic access checkbox. Then, next.
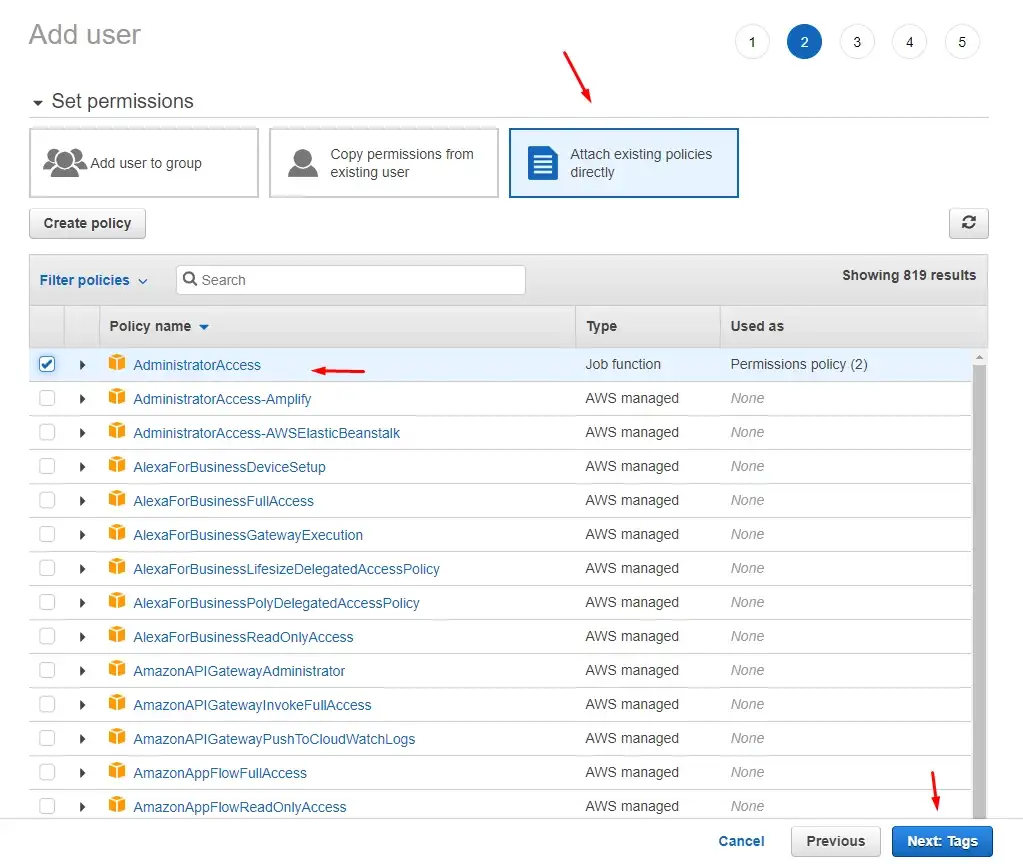
Step 4: On the permissions screen we click on Attach existing policies directly, then click on the AdministratorAccess policy and click next. To be fair you can select specific Lambda-related policies, but for the sake of this demonstration let’s go with the Admin policy.
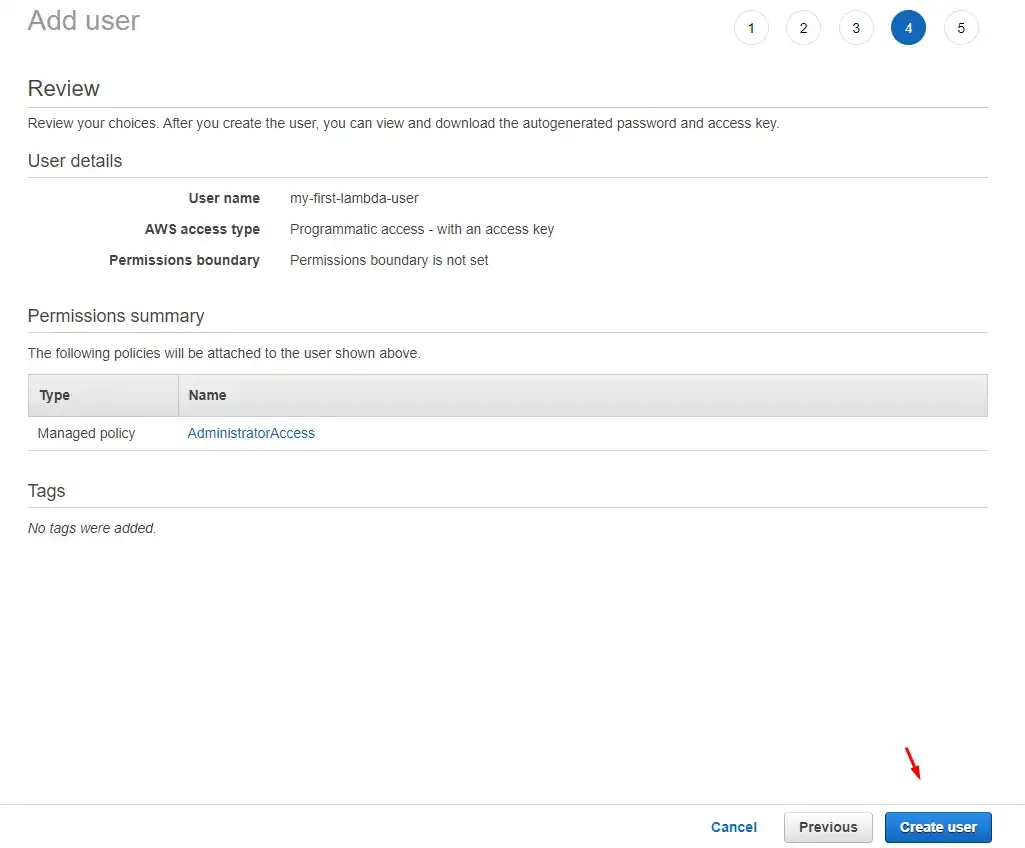
Step 5: We get to the Tags page that we can just skip. Then we land on the final page and just click Create user button.
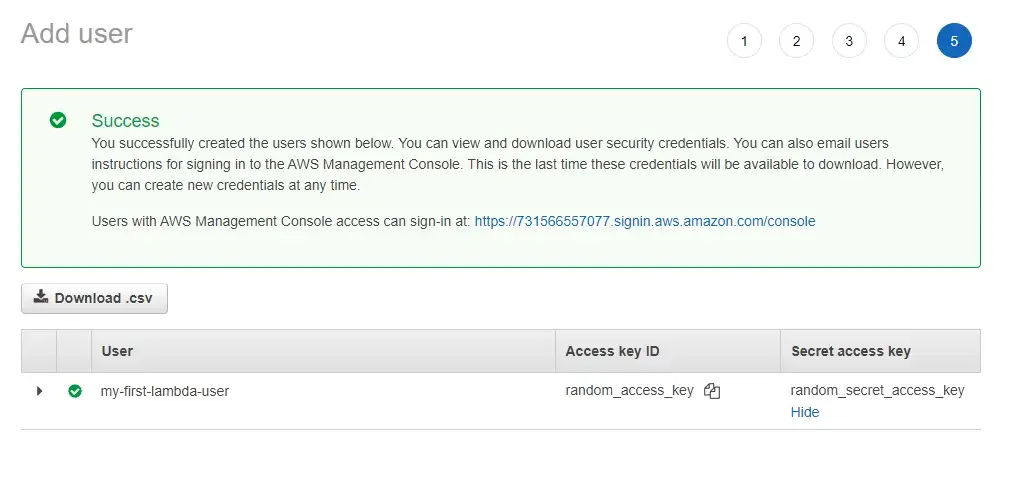
Step 6: On the final screen, we get our access key and secret key that we’ll use to authenticate with Serverless Framework. These are super important.
AWS will only show this credentials to us once and never again. If we lose them, we need to generate new. And also to not share this with anybody.
We’re done with the AWS website for now...
Now that we have our AWS Admin user, open up a terminal and install Serverless Framework on your
machine:
$ npm i -g serverless
After that, we sign up to Serverless via the terminal using the credentials we’ve just generated. (sls is short for serverless)
$ sls config credentials --provider aws --key our_key --secret our_secret
These are now set in stone on our machine. Every AWS deployment that we do will directly go to our AWS
account.
If you wish to change these credentials, go to the:
If you have multiple AWS accounts, you can easily switch from deploying Lambda from one account to another just by swapping these credentials. And also to not share this with anybody.
To keep things simple we’ll use sls command (short for serverless) from now on.
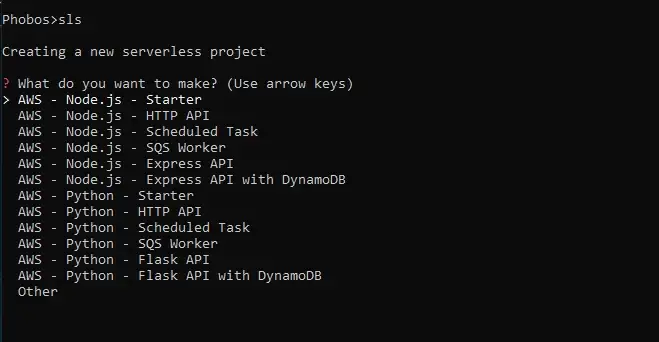 List of startup project options for us to choose
We then pick one of the options and hit enter to generate a project.
Another way we can do this is by creating an AWS Node.js template and optionally defining the
path (directory) where our app will live.
$ sls create --template aws-nodejs --path my-first-serverless-app
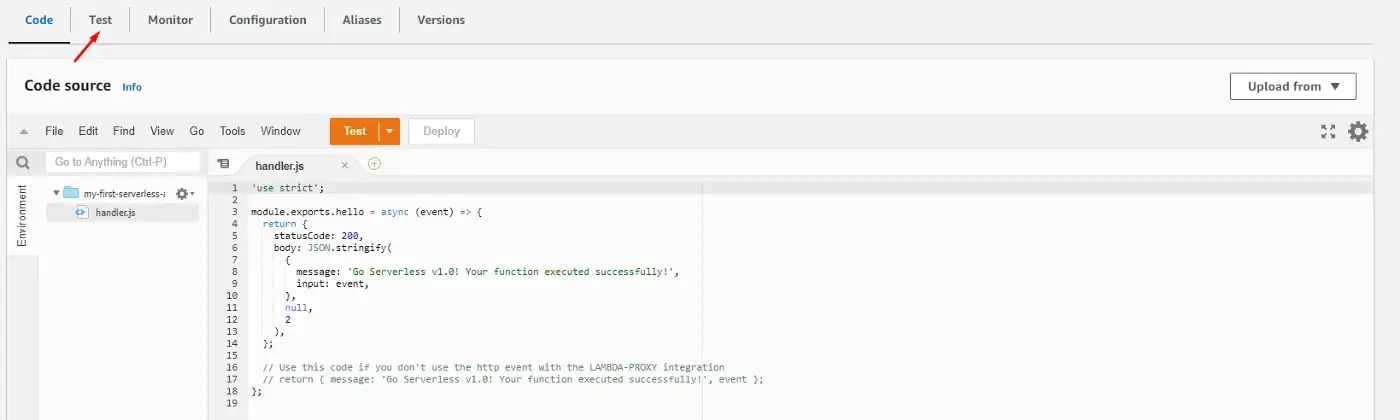
If we go into the directory we’ve just generated, we’ll find two files that are of interest to us, handler.js and serverless.yml.
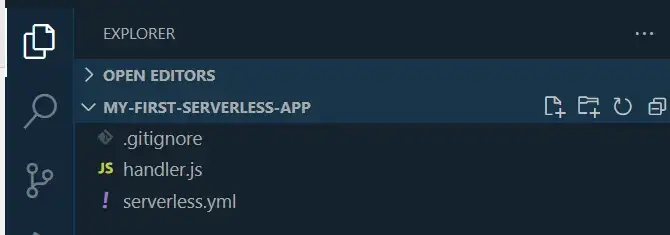 I’m using Visual Studio Code as my code editor
  'use strict';

    module.exports.hello = async (event) => {
      return {
         statusCode: 200,
         body: JSON.stringify(
        {
          message:'Go Serverless v1.0! Your function executed successfully!',
          input:event,
        },
           null,
           2
        ),
      };
     // Use this code if you don't use the http event with the LAMBDA-PROXY integration
     // return { message: 'Go Serverless v1.0! Your function executed successfully!', event };
    ;
The key parts here are the exports statement (that uses CommonJS syntax)
module.exportsand the name of the Lambda function hello that returns
some response.
This is a handler function that is invoked by the AWS, thus it must be exported. All of the code
related to the function should be within.
Another file we have here is the serverless.yml file. This is where we write the infrastructure
for our application. For the sake of simplicity, I removed most of the comments generated within this
file.
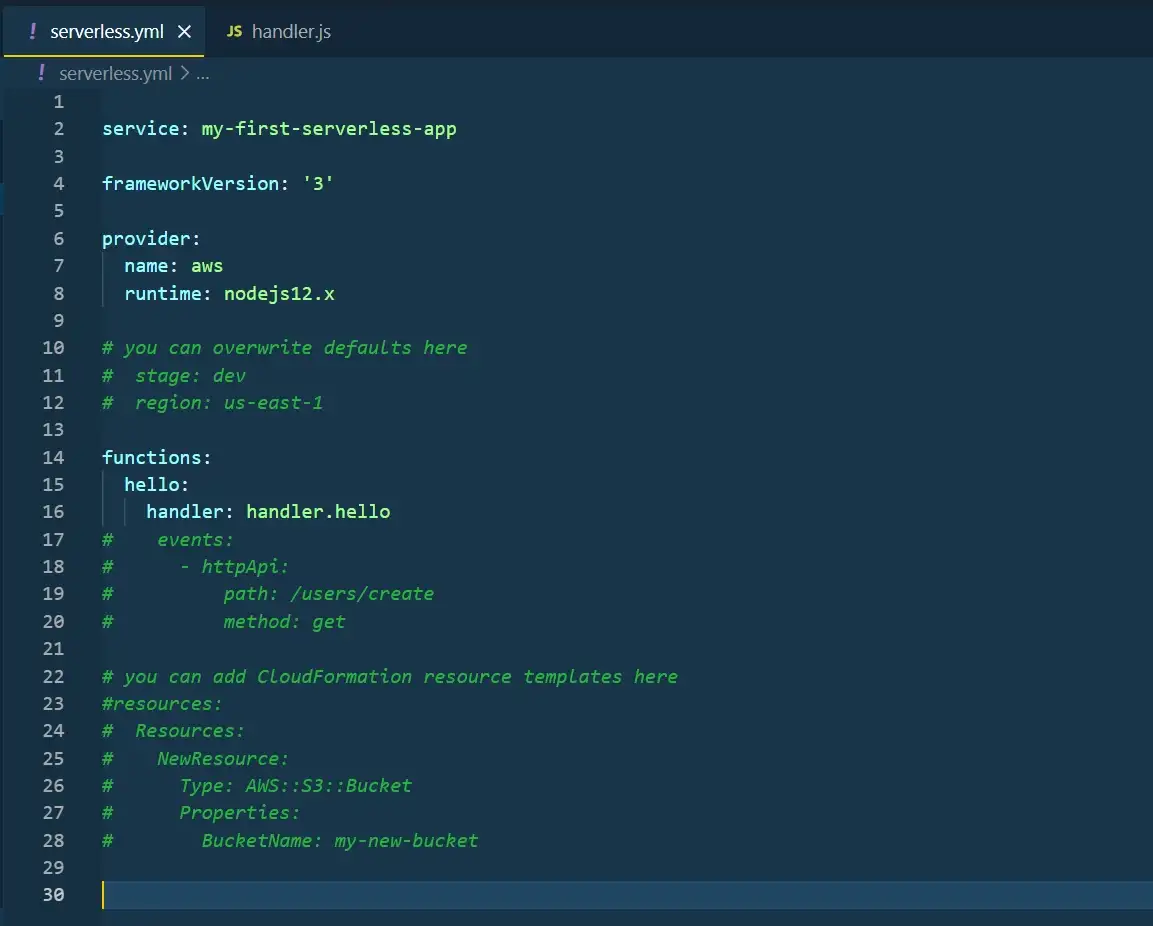
Preview of serverless.yml file generated by sls command.
Let’s break it down:
. . .
Keep in mind that once you generate a Lambda function in a certain region, it will live in that region. You can swap regions in the main navbar on AWS Console.
 AWS Home Page (AWS Console)
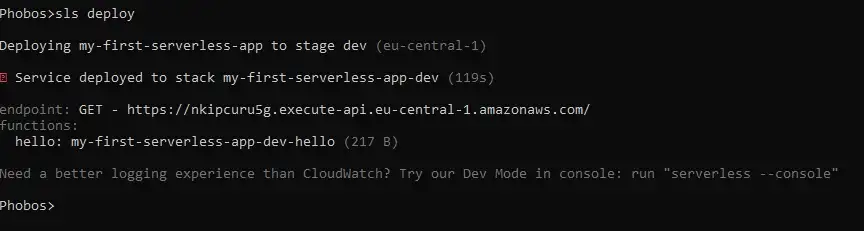
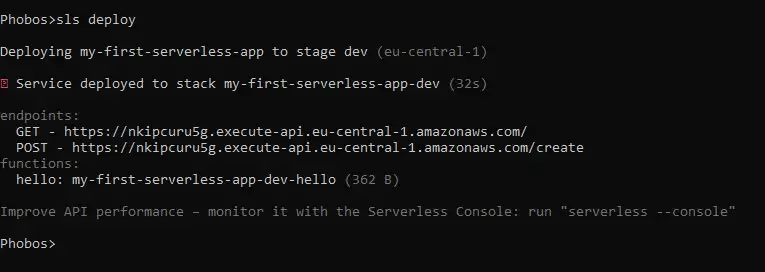
Now let’s deploy.
$ sls deploy
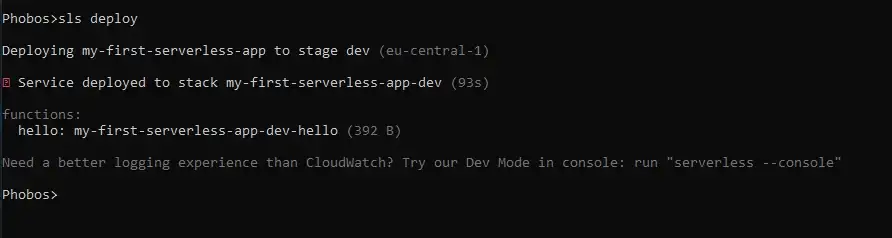
Serverless function deployment.
Upon deployment, the serverless.yml file generates a CloudFormation stack and links all resources that our function uses.
If we search for CloudFormation in the AWS Console and go there, we’ll see our function. (as long as we’re in the correct region).
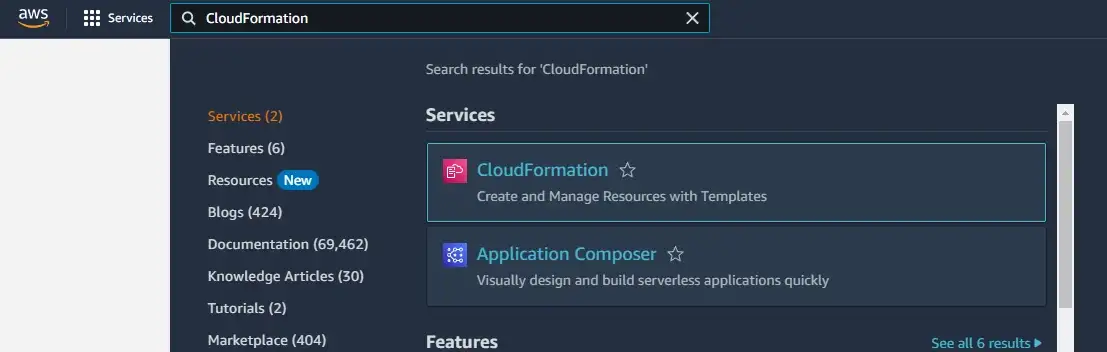 Search for CloudFormation in AWS Console
 CloudFormation dashboard in AWS Console
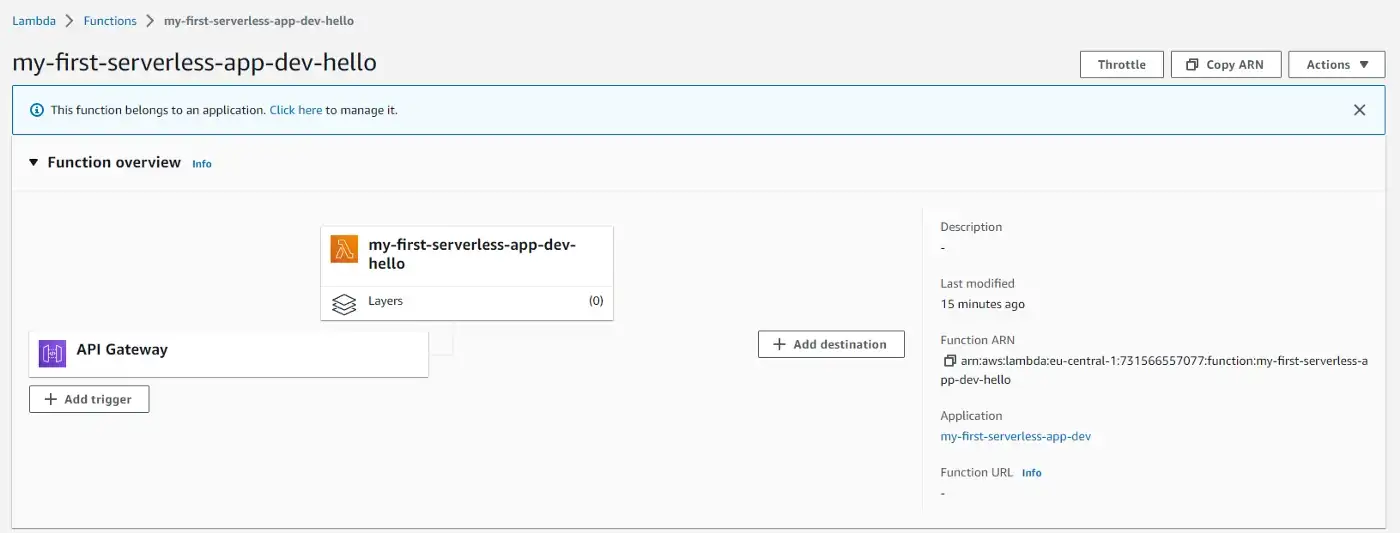
If we click on our function in the table, it will open up a new window. Then click on the Resources tab and this will display all connected resources relevant to our function, like the IAM roles, the S3 bucket in which our Lambda is deployed, and the link to the function itself.
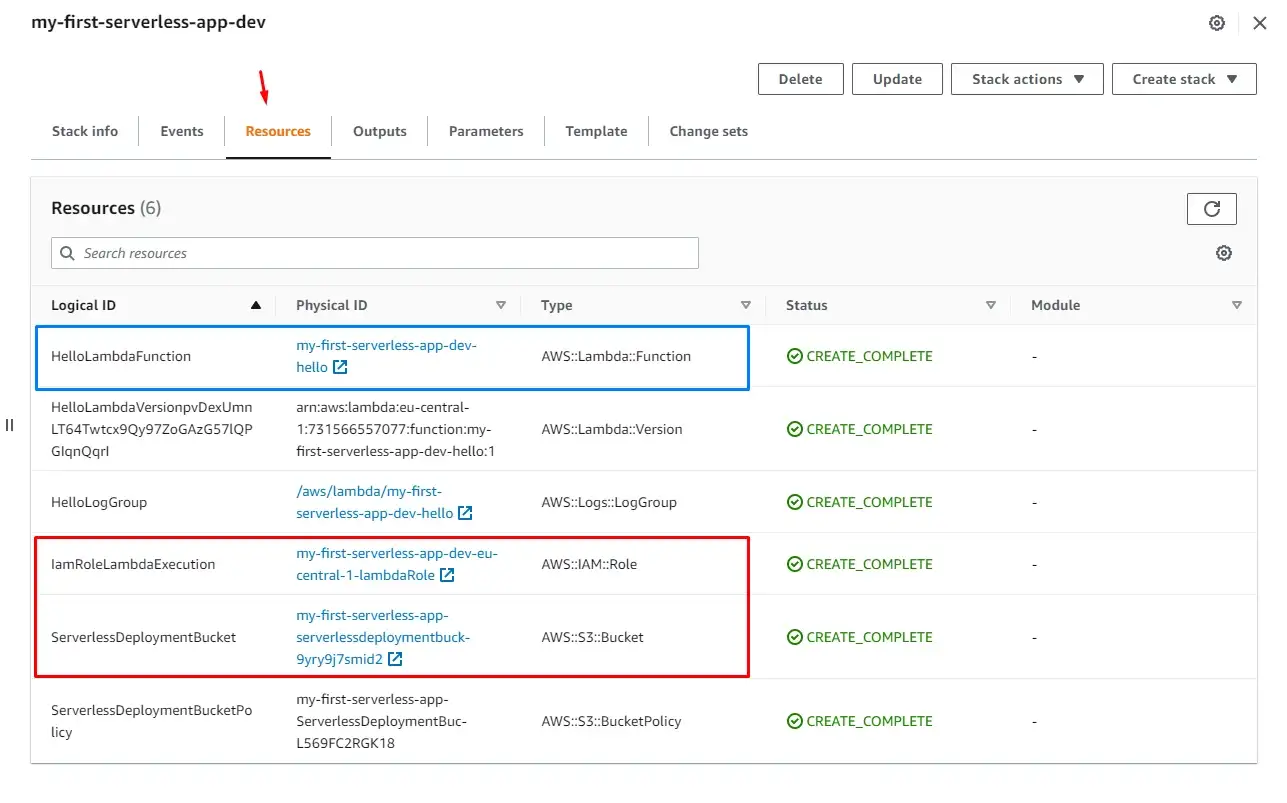 CloudFormation Stack generated by Serverless.yml
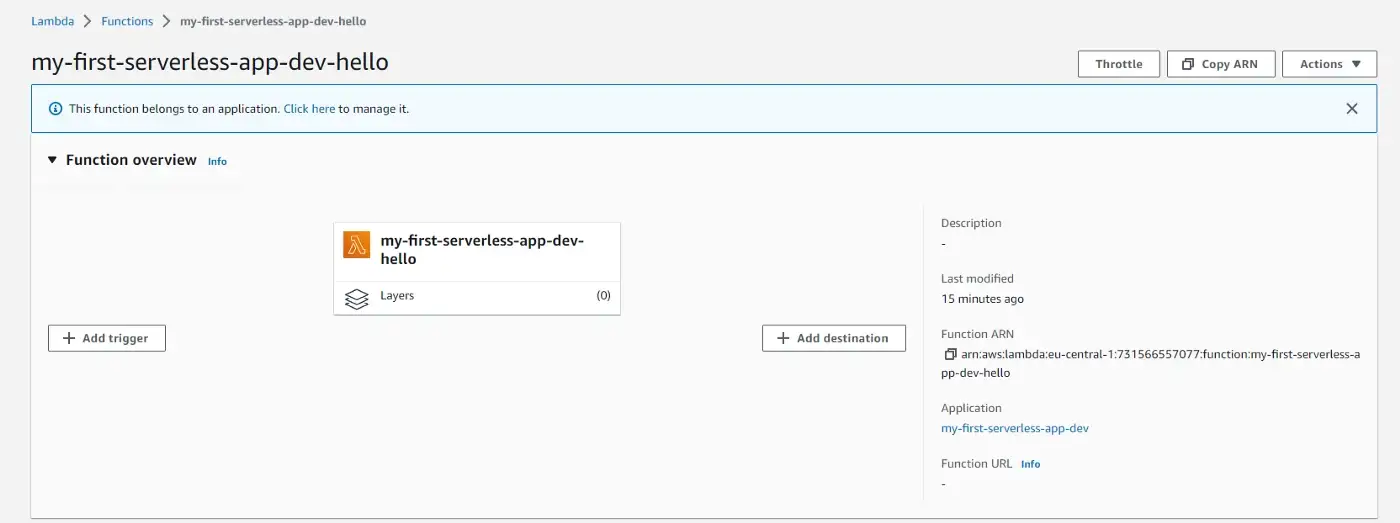
Clicking on the function (blue rectangle) will take us to the AWS Lambda screen.
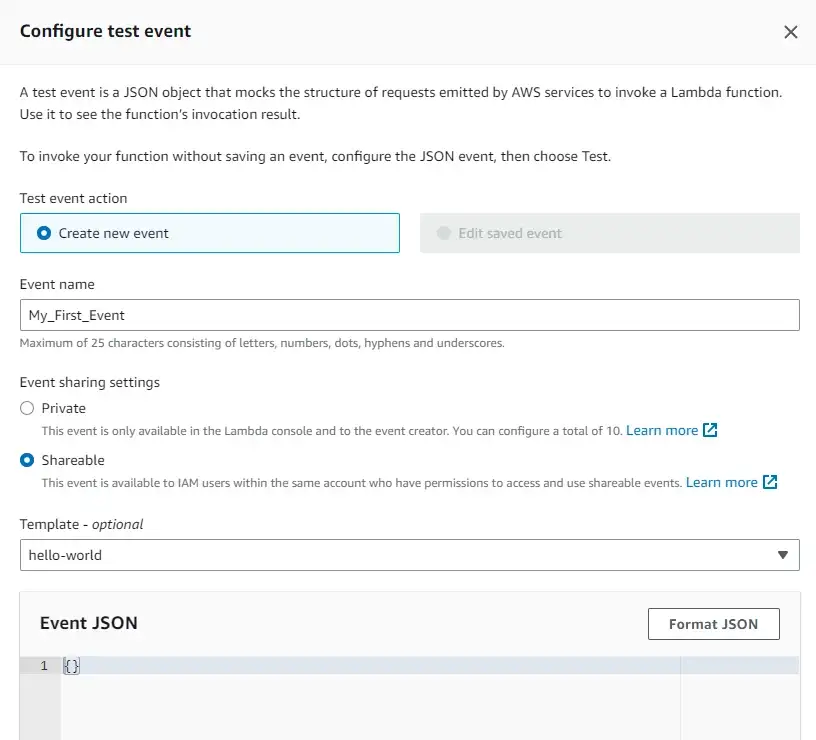
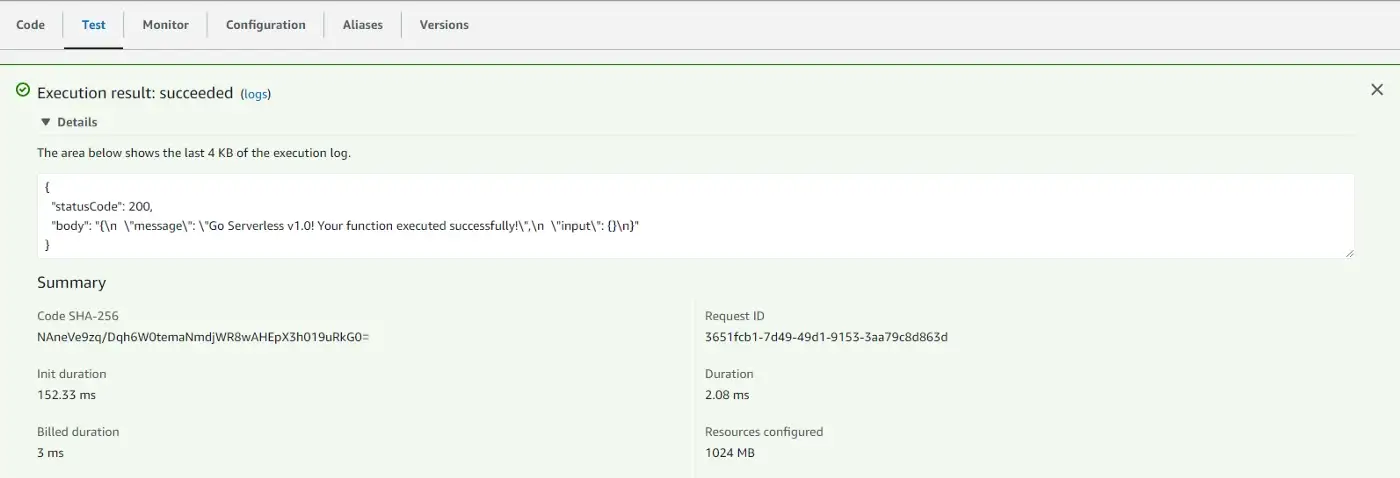
Scrolling down, we can see the code of our function. We can test it by clicking on the orange Test button.
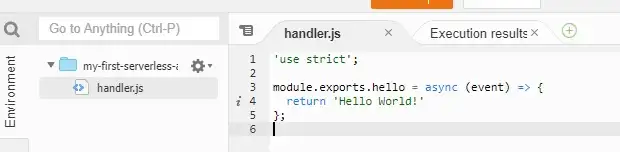
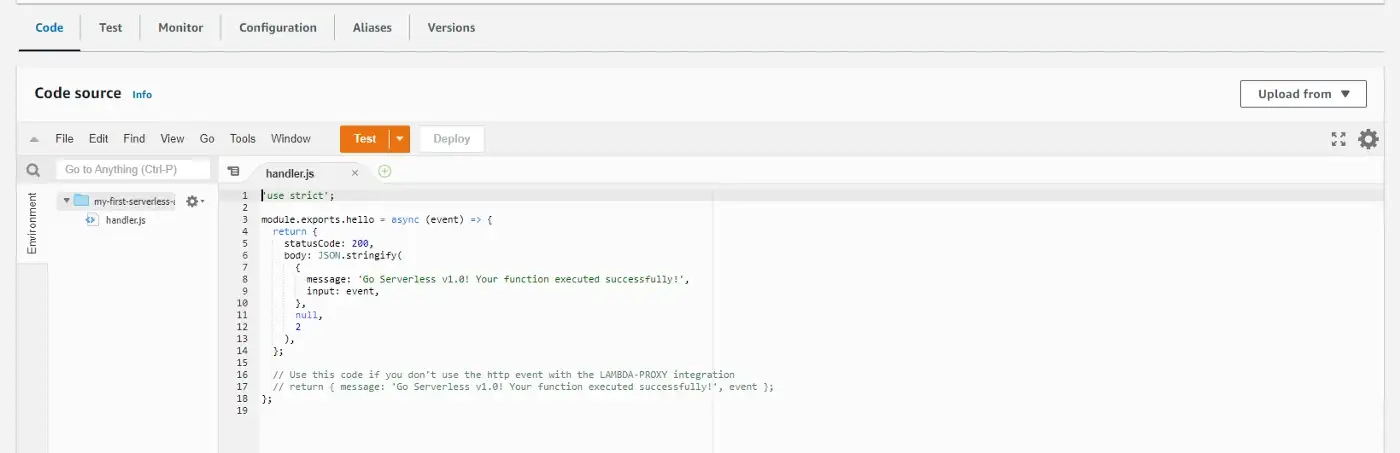 Code from the previously generated handler.js file.
This will pop up a modal for us to write details about our test. We enter the Event name and leave everything else as default.
Now click Save on the modal and then on the Test button in the navigation.
Select the event we’ve just created and click on the orange Test button again.
We see that everything went well and the code returned to us is what we wrote in the function
(handler.js).
Let’s change our function code a bit and deploy it again.
'use strict';
  module.exports.hello =  async (event) => {
    return  'Hello World!'
  };
The event parameter that we see in the function is an object that returns the information on the request, such as the request method, body, query parameters, etc.
This time we haven’t changed our infrastructure at all, thus when deploying we can use a shorthand to just deploy the function code.sls deploy -f hello // -f is shorthand for function
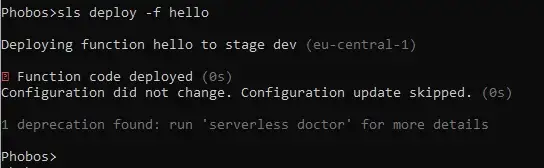 This deployment is much faster
Then we can head over to the AWS Console and once again test our code.
 The Lambda page should have our latest changes
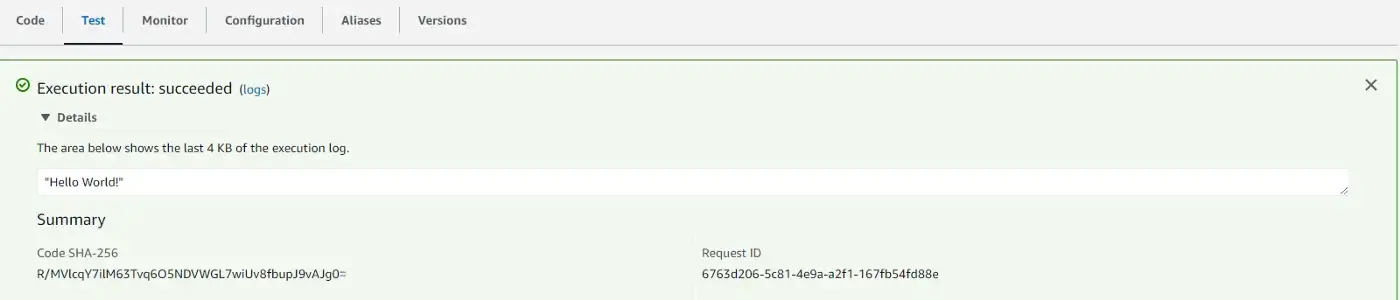 Test passed
Now you might be wondering can we use NPM modules in our Lambda functions?
Yes, we can!
However, there are things to keep in mind:
Alternatively, we can upload our code to the S3 bucket and link Lambda to S3 — which is what the Serverless Framework is already doing for us behind the scenes.
 Manually link function code uploaded to S3 and create Lambda
function
Manually link function code uploaded to S3 and create Lambda
function
From here we can add triggers to our Lambda function, setup timeout, and other configuration options, but we won’t do it in that manner. Why? Because we’re using Serverless Framework to set up infrastructure — so that we do not need to click around.
. . .
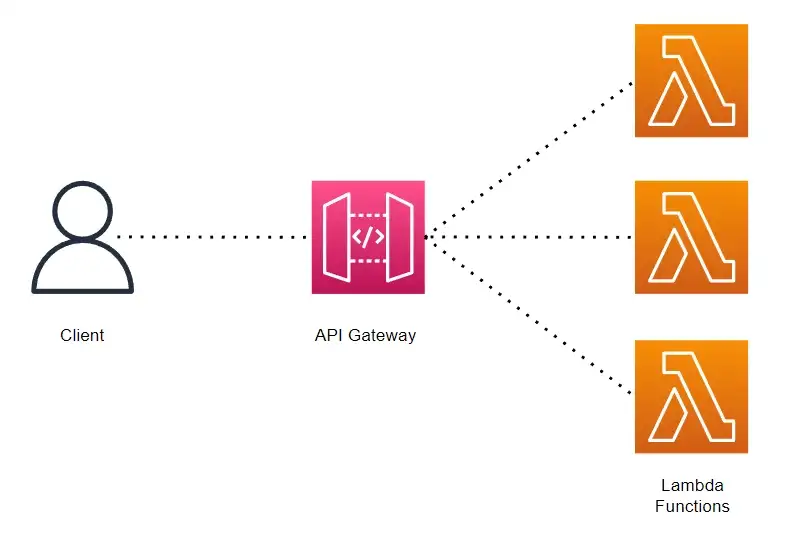 API Gateway illustration created using Draw.io
To do this we edit the serverless.yml file and include the HTTP API in the events section.
functions:
 hello:
    handler: handler.hello
    events:
     - httpApi:
        path:   /
        method:  get
        };
$ sls deploy
 Serverless deployment with API Gateway
This time we also get an API endpoint as a response. If we visit this URL in the browser it should return the correct response.
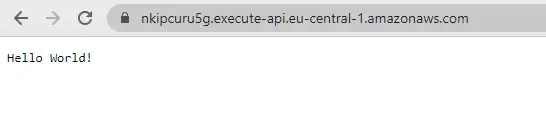 URL of recently deployed Serverless function
Another way to invoke this API is to it directly from the terminal.
$ sls invoke -f hello -l // where -f stands for function and -l for logs
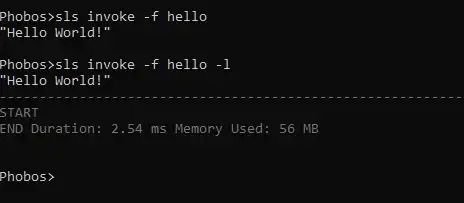 Invoking Lambda function from the terminal
If we go to our Lambda Function in the AWS Console, we can see that the function now has a link to the API Gateway on this screen as well as in the CloudFormation resources screen.
. . .
  module.exports.hello = async (event) => {
    console.log( 'event :>> ', event);

    if (event.requestContext.http.method === 'POST') {
      return {
        statusCode: 201,
        body: JSON.stringify({
          message: 'Resource created!',
      }),
    };
  }

  return {
      statusCode: 200,
      body: JSON.stringify({
        message: 'Resource retrieved!',
    }),
  };

};
 functions:
   hello:
     handler:handler.hello
     events:
       - httpApi:
            path: /
            method: get
       - httpApi:
            path: /create
            method: post
What we’ve done here is created two routes in the same file. We can also create multiple functions
(handler files) and separate each route into its own function. Read more about Serverless Architecture Patterns.
We’ll also allow CORS in the provider section so that everyone can access our routes. More on CORS
in the docs.
    provider:
      name:   aws
      runtime: nodejs12.x
      httpApi:
        cors:  true
Let’s run the deploy command again.
$ sls deploy
Now we have two endpoints that we can interact with.
Let’s test these routes:
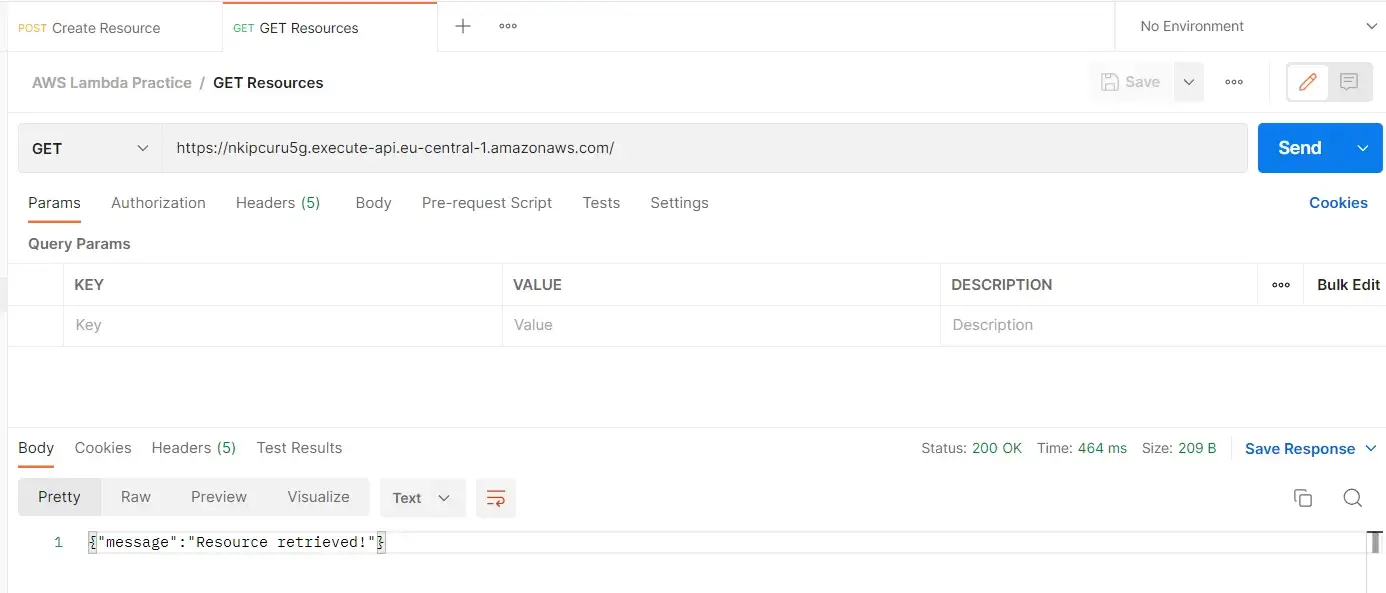 Testing GET route
One important step for sending a POST request is to set a Content-Type header to application/json.
 Setting required headers
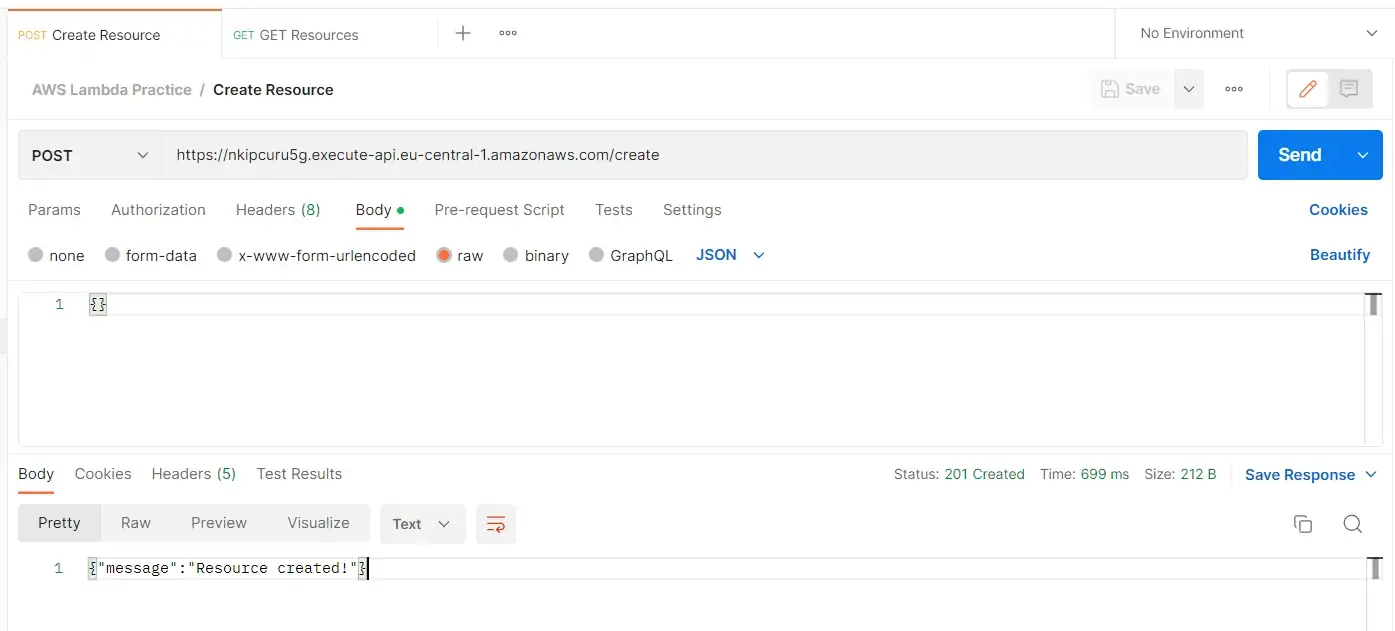 Testing POST route
  const URL = `https://nkipcuru5g.execute-api.eu-central-1.amazonaws.com`;

  fetch(URL, options)
  .then((response) => {
    return response.json();
  })
  .then((jsonObject) => {
    console.log(jsonObject) // {message: 'Resource retrieved!'}
  })
  .catch((error) => {
    console.error(error);
  });
  const options = {
    method: 'POST',
    data: {},
    headers: {
      'Content-Type': 'application/json'
    }
  };

  const URL = `https://nkipcuru5g.execute-api.eu-central-1.amazonaws.com/create`;

  fetch(URL, options)
    .then((response) => {
      return response.json();
    })
    .then((jsonObject) => {
      console.log(jsonObject) // {message: 'Resource created!'}
    })
    .catch((error) => {
      console.error(error);
    });
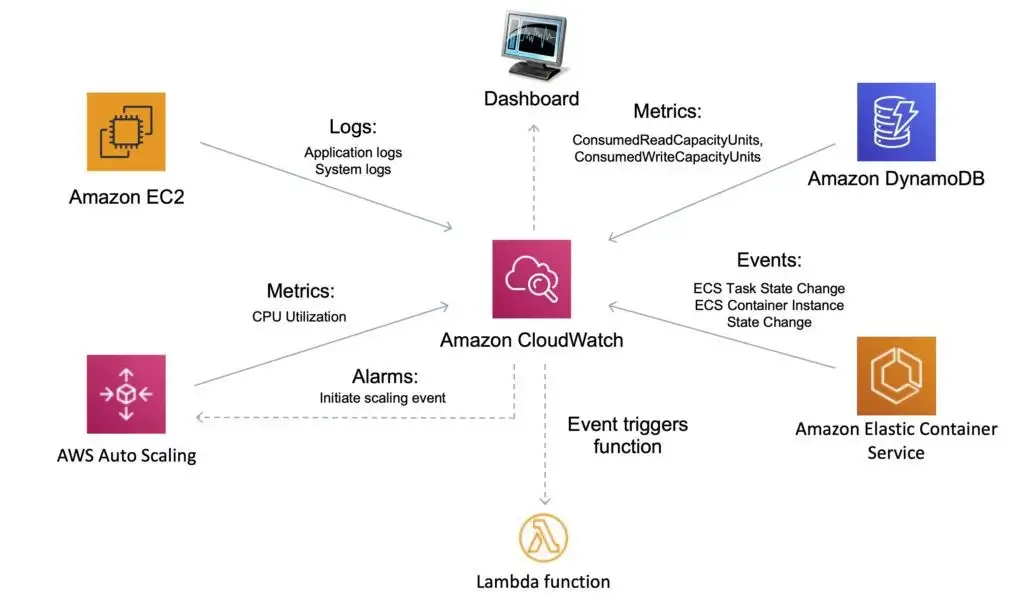 CloudWatch illustration by DigitalCloudTraining
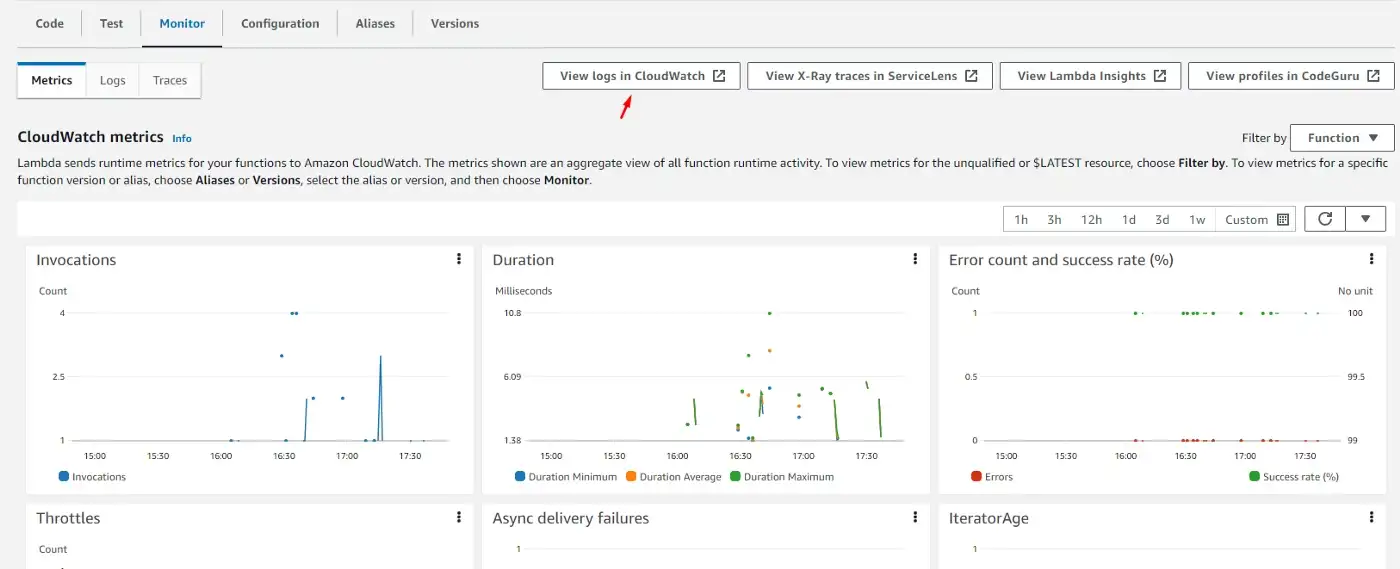
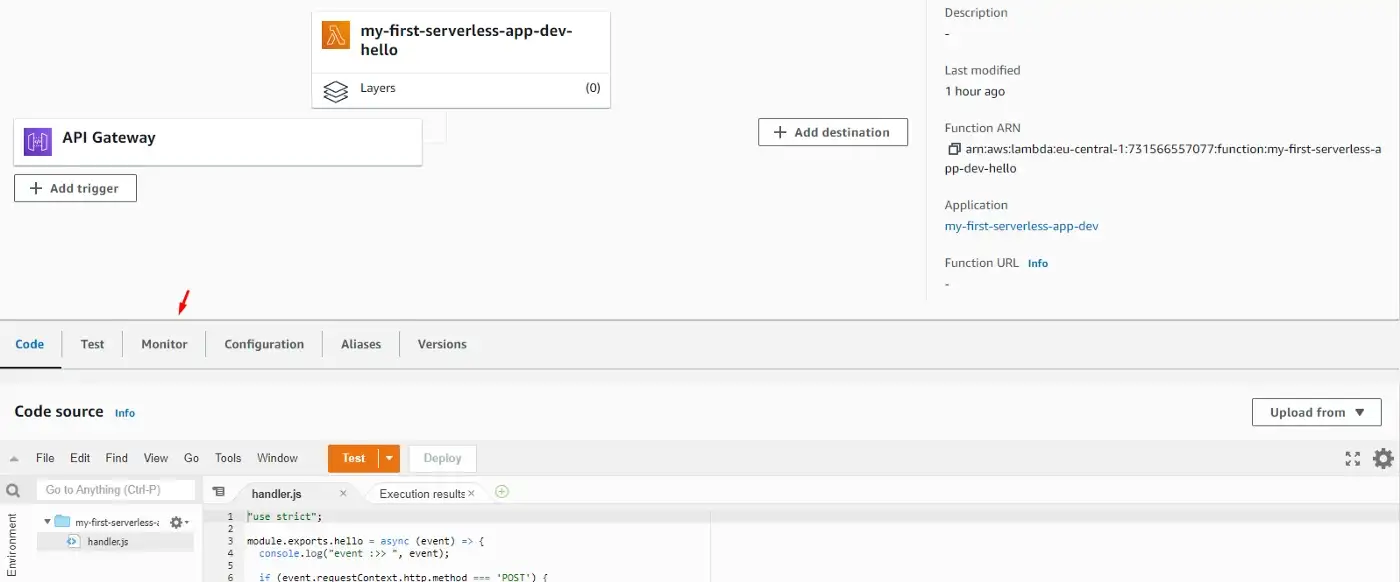 AWS Lambda screen for our function
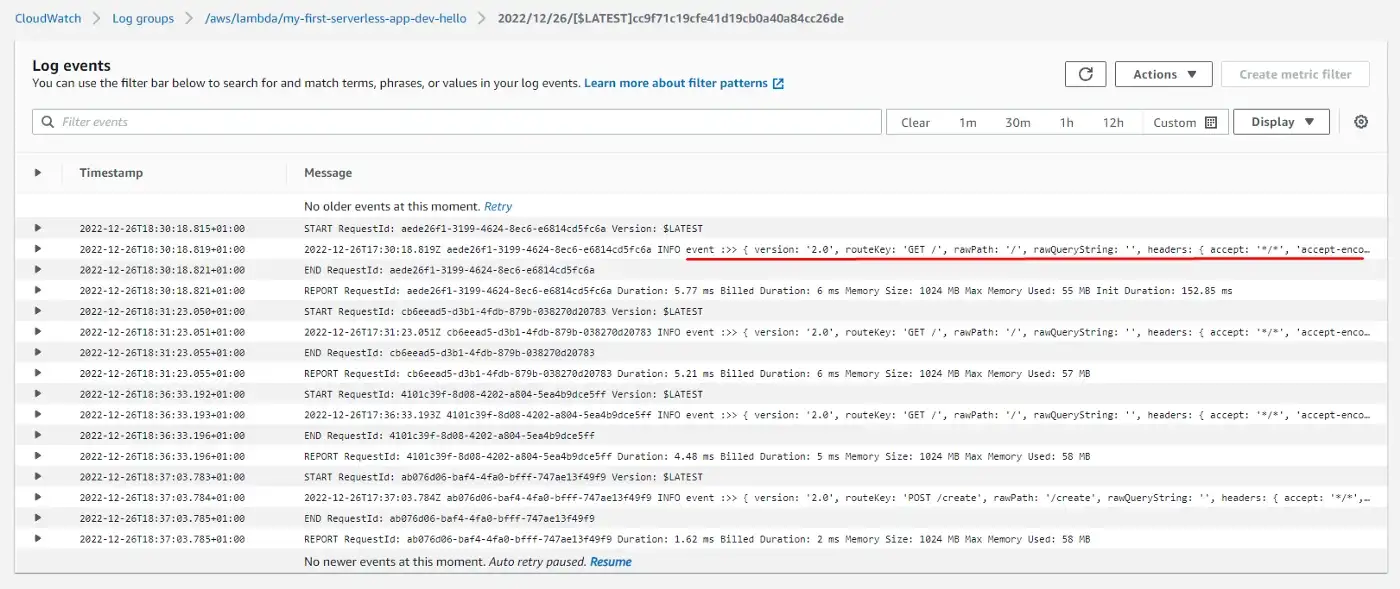
This opens a list of options, but what we’re interested in is the View logs in CloudWatch option.
AWS Lambda screen for our function
Then we get to the page where we can see logs in order and we can click on each to preview what happened at that point in time.
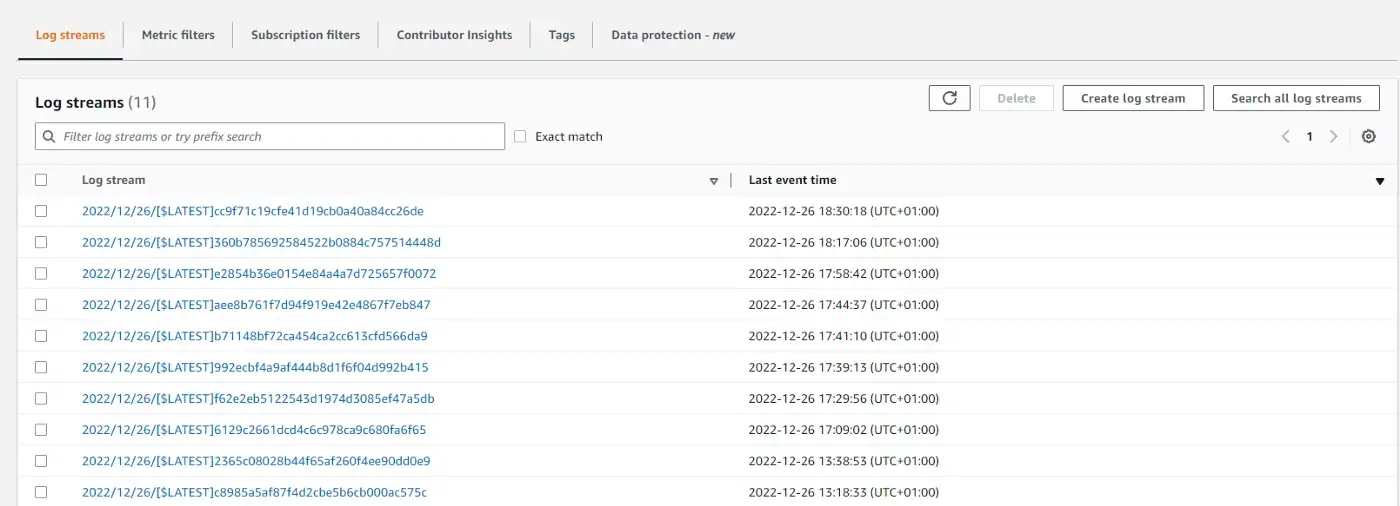
Here we can see the list of events that occurred and even our event object that we previously logged to the console. We can expand each by clicking on the chevron icon on the left.
. . .
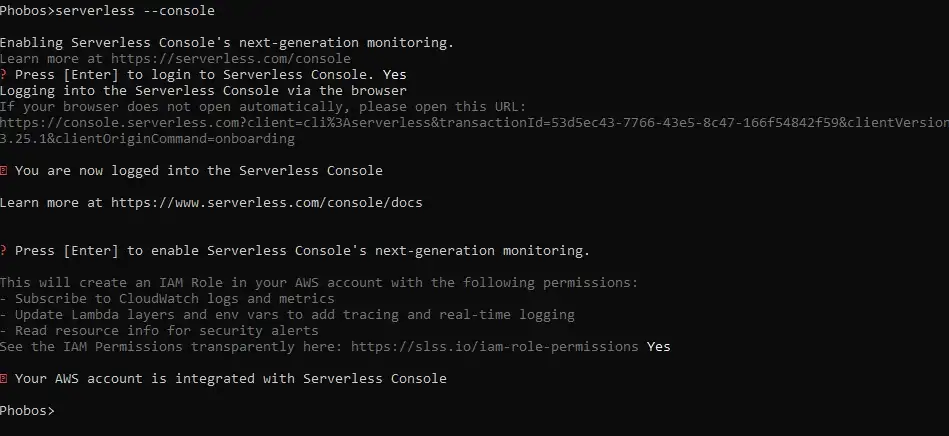
Another way to monitor logs is to use Serverless Console provided by the Serverless Framework. To enable it, simply run:
$ sls --console
First, it prompts to enable access to AWS and create an IAM role.
Then we need to register or log in to the Serverless Dashboard opened in the browser.
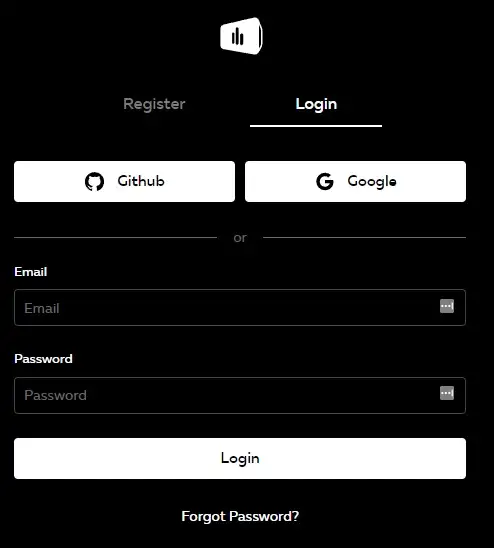 Log in screen to Serverless Console
After a few minutes of setup, we go to the Serverless Console and find our service. We also need to enable Logs, Traces, and Dev mode (because so far we’ve been only using the dev stage).
 Setting up the configuration for our function
Then make a few requests (GET or POST) and the metrics will appear almost in real-time.
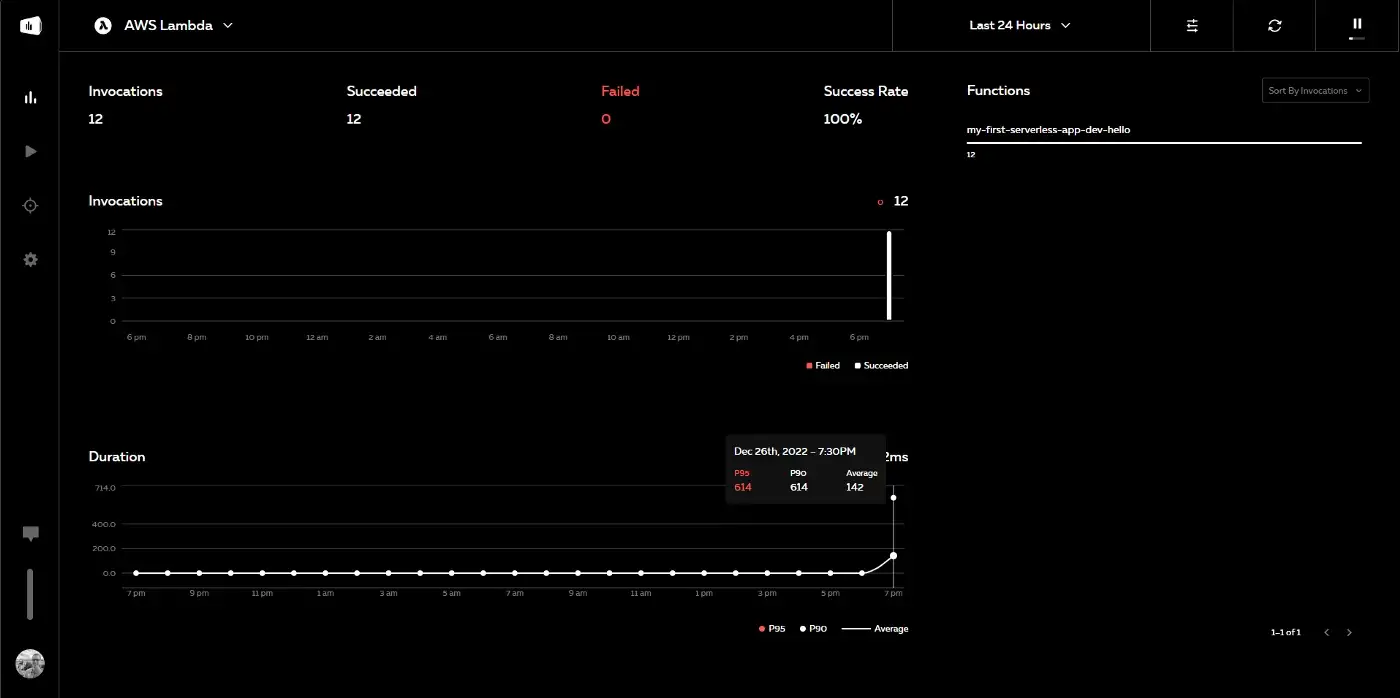 Monitoring metrics with Serverless Console
. . .
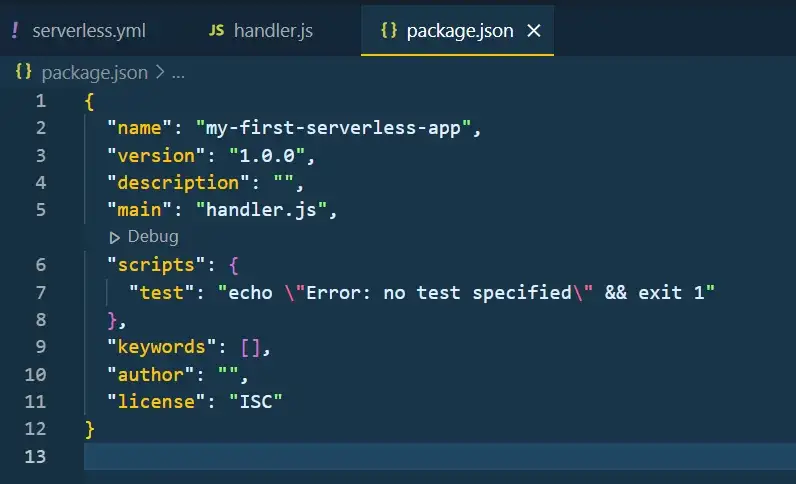
To start we need to initialize an NPM project, npm init -y :
This will create a package.json file in the project directory.
Now let’s install serverless-offline as a dev-dependency.
$ npm i --save-dev serverless-offline
The next step is to add a serverless-offline plugin to our serverless.yml file:
  plugins:
         - serverless-offline
With this in place, we can use the help command to verify that everything is set correctly and see the list of options available to us.
$ serverless-offline --help
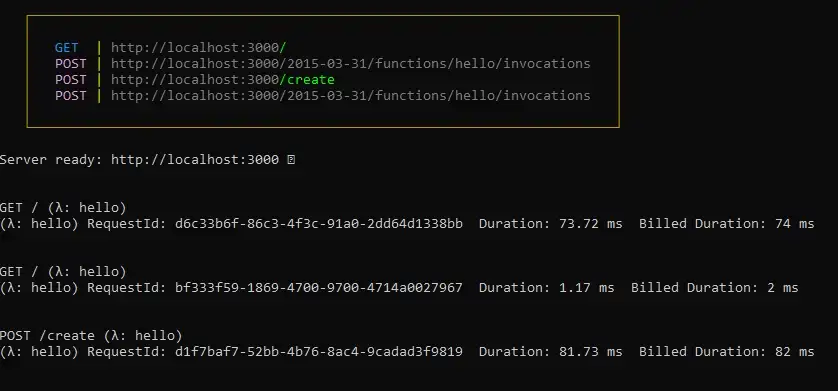
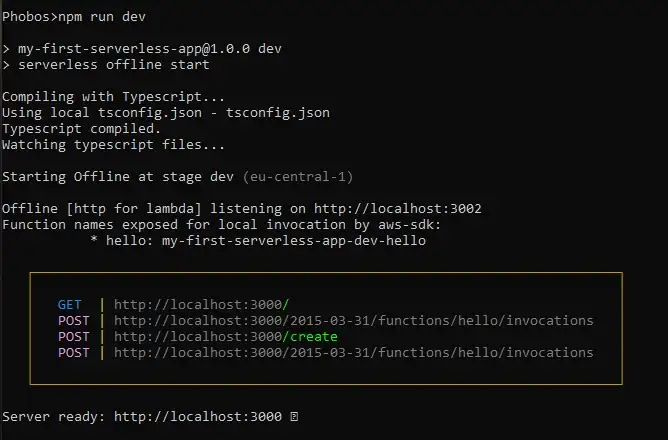
Now we run Serverless locally.
$ sls offline start
 Serverless Offline creates a local server on our machine on port
3000 and exposes routes available to us.
Serverless Offline creates a local server on our machine on port
3000 and exposes routes available to us.
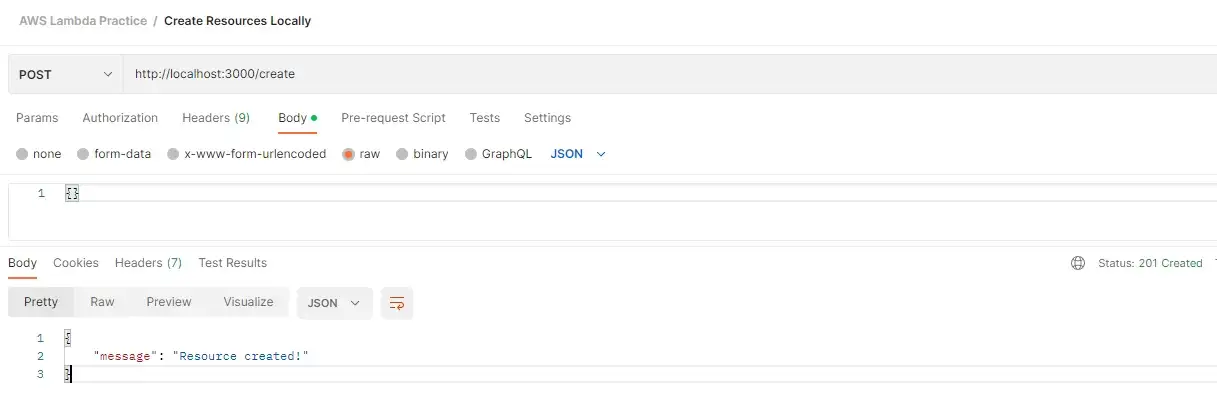
Now let’s test it using Postman.
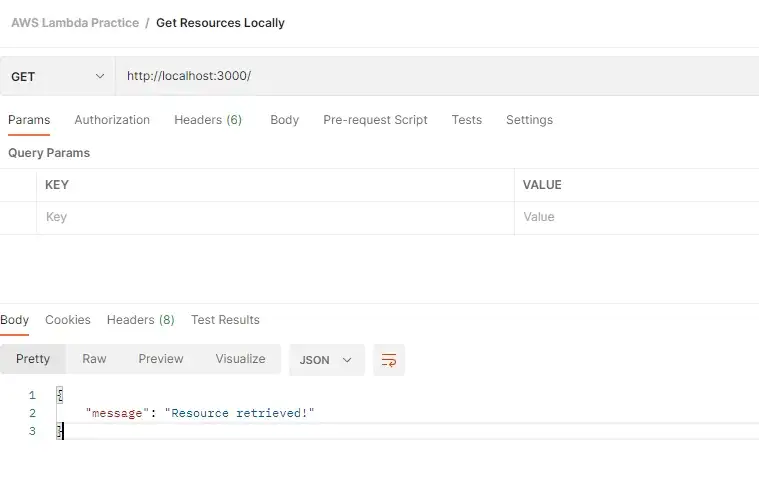 Testing Serverless function locally
And we can see our requests logged in the console.
If we need to make a code change, we simply shut down the server through the terminal (CTRL/CMD + C) and run in again, using the same command again. For NPM geeks, we can bind this command to a script in the package.json file and execute it with ease.
{
  "name":  "my-first-serverless-app",
  "version": "1.0.0",
  "description": "",
  "main":  "handler.js",
  "scripts": {
    "dev": "serverless offline start"
  },
  "keywords":[],
  "author":"",
  "license": "ISC",
  "devDependencies": {
    "serverless-offline": "^12.0.3"
  }
}
We can name this script whatever we want, but I chose dev . Now we run:
. . .
    provider:
      name: aws
      runtime: nodejs12.x
      httpApi:
        cors: true
      environment:
        DUMMY_API_KEY: 'Dummy value'
Then we can access this variable using process.env object in handler.js file:
    module.exports.hello = async (event) => {
      console.log('Dummy env var :>> ', process.env.DUMMY_API_KEY);
      ...
    }
If we make another request to a server, we should see this log printed in the terminal.

. . .
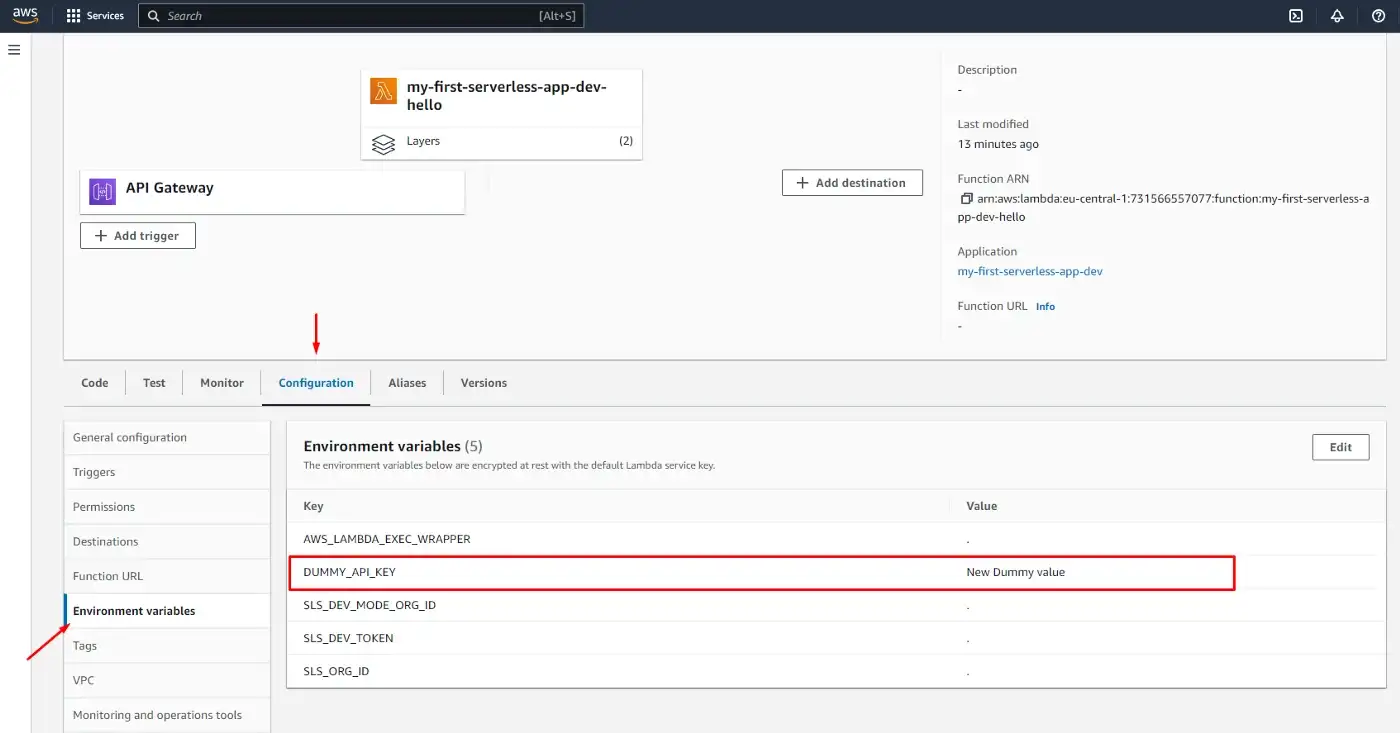
The previously set Environment variable was global for the whole service, but we can also set variables per functions that will override the global ones (if named the same):
     functions:
       hello:
         handler: handler.hello
         environment:
           DUMMY_API_KEY: 'New Dummy value' # will override the previous
         events:
           - httpApi:
               path: /
               method: get
           - httpApi:
               path: /create
              method:  post
Once the variables are set, we can find them on the AWS Lambda screen, under Configuration, Environment variables.
Read more on Environment variables in Serverless Framework.
 Photo by Monstera from Pexels
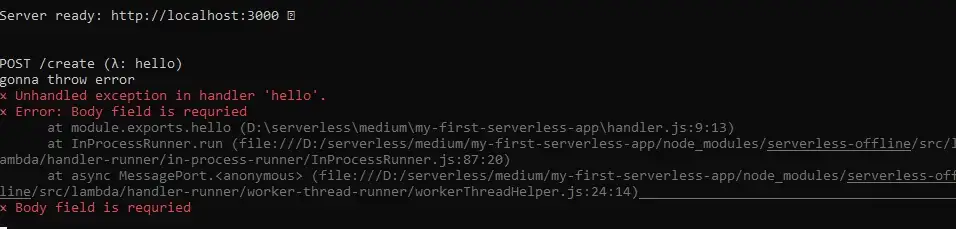
At some point, we may want to validate the user’s input. Here we set up a condition to validate the request body and if it’s invalid, we return an error.
  module.exports.hello = async (event) => {

    if (event.requestContext.http.method === 'POST') {

      if (!event.body) {
        console.log('gonna throw error')
        throw new Error('Body field is requried')
      }

      return {
       statusCode: 201,
       body:  JSON.stringify({
         message:"Resource created!",
        }),
      };
    }
  ...
  }
 Sending request without body object
 Errors in the terminal
That didn’t go as expected. We have two problems:
 const createError = require('http-errors'); // importing package

 module.exports.hello = async (event) => {

   if (event.requestContext.http.method === 'POST') {

     if (!event.body) {
       throw createError(400, `Field "body" is required!`); // using it
     }
Now we get a more readable error.
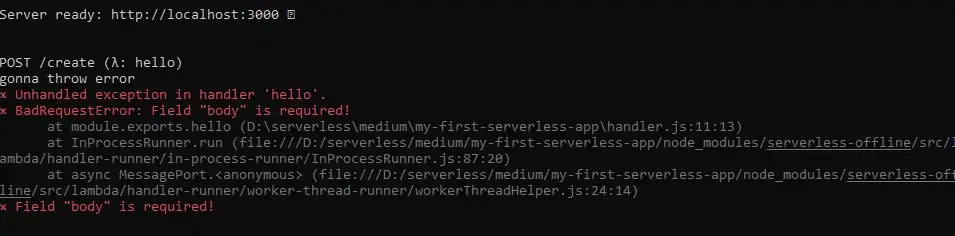
However, the status code is still 200. To fix this we need to introduce error-handling logic.
. . .
We’ve just installed three packages:
   const middy = require('@middy/core' );
   const httpErrorHandler = require('@middy/http-error-handler');
   const errorLogger = require('@middy/error-logger');

   module.exports.hello = middy(async (event) => {
     ...
   })
     .use(httpErrorHandler())
     .use(errorLogger())
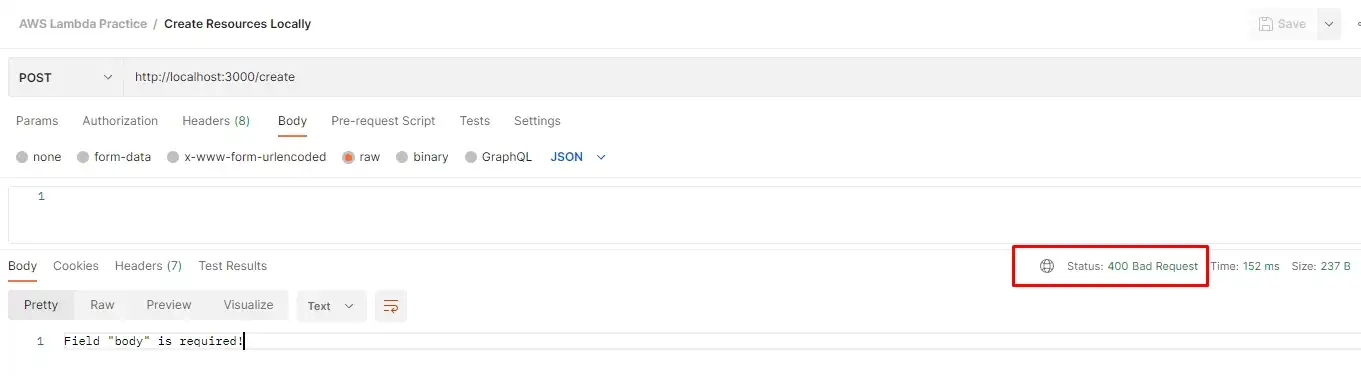
Let’s send an invalid request.
However, the status code is still 200. To fix this we need to introduce error-handling logic.

Error is thrown as expected, but the app is still up.
If we look into Postman, we can see that the HTTP status code is now 400 (Bad Request).
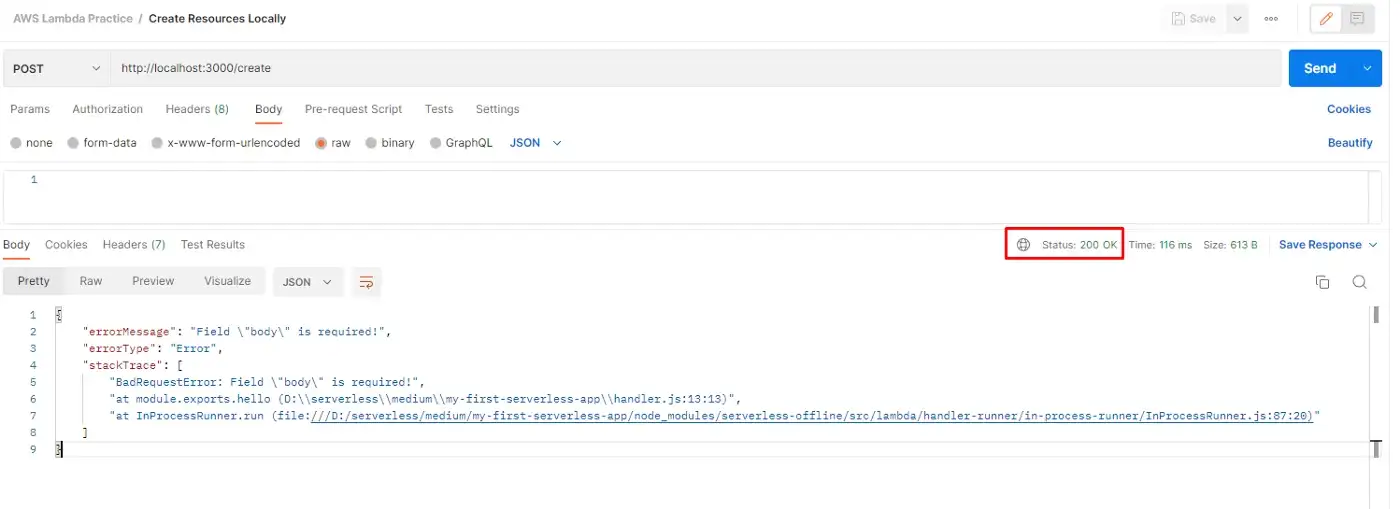
And of course, if we send the body in the request (even if it’s empty), the response will be successful.
Middy middleware is more than an error handler. We can use it to normalize requests, hide unwanted headers, cache response, set up CORS, SSM, etc. Read more on Middy.
   "@middy/core": "^2.5.7",
   "@middy/error-logger": "^2.5.7",
   "@middy/http-error-handler": "^2.5.7"
To use the latest Middy version (installed by npm), go to the provider section of the YAML file and change the Node.js runtime version to 16.
  provider:
    name: aws
    runtime: nodejs16.x
Then deploy and everything should work as expected.
 Testing error handler in production (Middy 4.09 and Node.js
16.x)
Testing error handler in production (Middy 4.09 and Node.js
16.x)
. . .
What we do not need to do is reinstall Middy as this package supports TypeScript out of the
box.
We also need to initialize TypeScript to get the tsconfig.json file:
And add the plugin we’ve just installed (serverless-plugin-typescript) to the plugins section in our YAML file:
The beauty of this plugin is that it will do TypeScript builds for us. Upon running, it will create a
.build directory specified in the tsconfig.json file.
Now we can rename our handler.js file to the handler.ts and begin refactoring.
{
  "compilerOptions": {
     "preserveConstEnums" true,
     "strictNullChecks" true,
     "sourceMap" true,
     "allowJs" true,
     "target" "es2017",
     "outDir" ".build",
     "moduleResolution" "node",
     "lib" ["es2017"],
     "rootDir" "./",
     "strict" true,
     "module" "commonjs",
     "esModuleInterop" true
  },
   "include" [
    "**/*"
  ],
   "exclude" [
    "node_modules",
    "**/*.spec.ts"
  ]
}
   import { APIGatewayEvent } from 'aws-lambda';

   import middy  from '@middy/core';

   import httpErrorHandler  from '@middy/http-error-handler';
   import errorLogger  from '@middy/error-logger';
   import createError  from 'http-errors';

   export const hello = middy( async (event: APIGatewayEvent) => {
     if (event.requestContext.routeKey?.includes('POST')) {
       if (!event.body) {
         throw createError( 400,  'Field "body" is required!');
      }

       return {
        statusCode: 201,
        body: JSON.stringify({
          message:  'Resource created!',
        }),
      };
    }

     return {
      statusCode:  200,
      body: JSON.stringify({
        message:  'Hello AWS Lambda TypeScript on Serverless Framework!',
      }),
    };
  })
    .use(httpErrorHandler())
    .use(errorLogger());
 service:  my-first-serverless-app

  frameworkVersion:  '3'

  provider:
    name:  aws
    runtime:  nodejs16.x
    httpApi:
      cors:  true
    environment:
      DUMMY_API_KEY:  'Dummy value'

    stage:  dev
    region:  eu-central-1

  functions:
    hello:
      handler:  handler.hello
      environment:
        DUMMY_API_KEY:  'New Dummy value'
      events:
        - httpApi:
            path:  /
            method:  get
        - httpApi:
            path:  /create
            method:  post

  plugins:
   - serverless-offline
   - serverless-plugin-typescript
Let’s run it npm run dev
 Preview of the terminal
 Photo by Devopedia
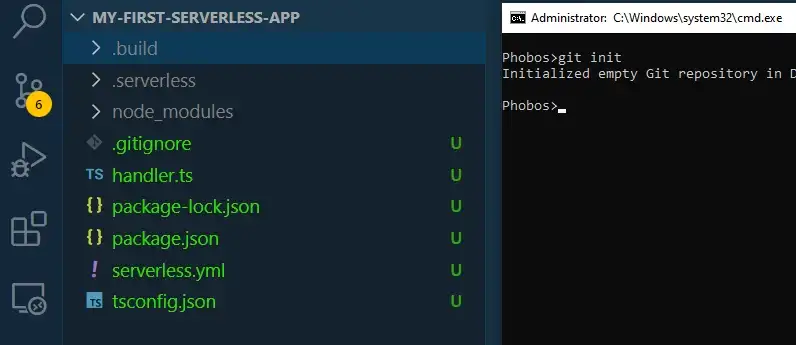
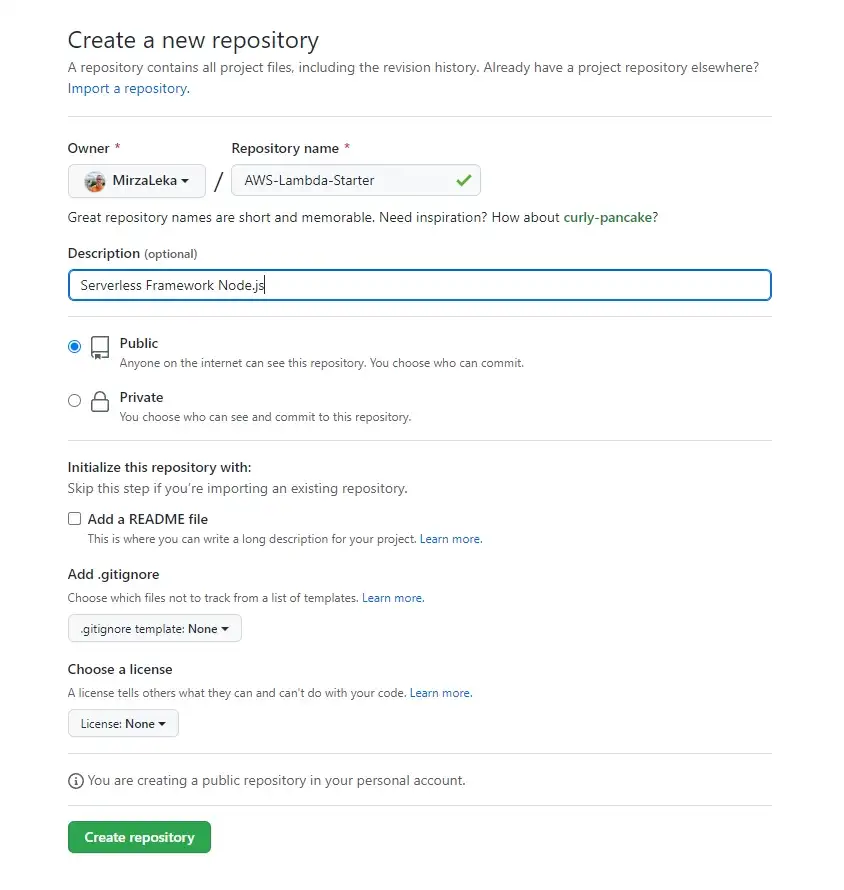 Creating new repository
Initialize the repository in your project directory by running git init
Which then highlights all files that are not .gitignored.
  git  init
  git  add .
  git commit -m "initial commit"
  git branch -M main
  git remote  add origin https: //github.com/USERNAME/Your-Repository.git
  git push -u origin main
Now our code should be deployed to Git.
. . .
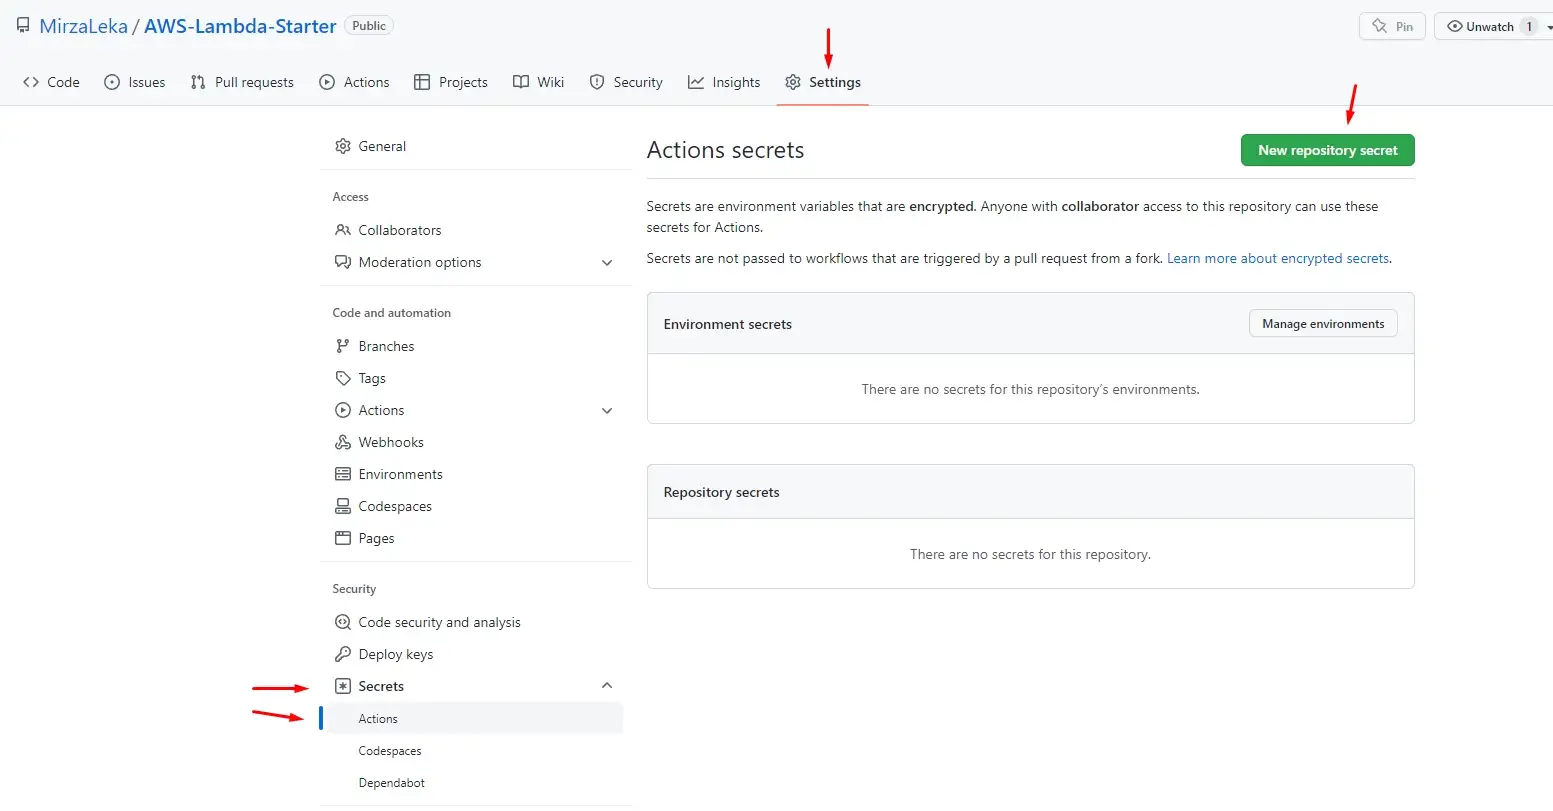
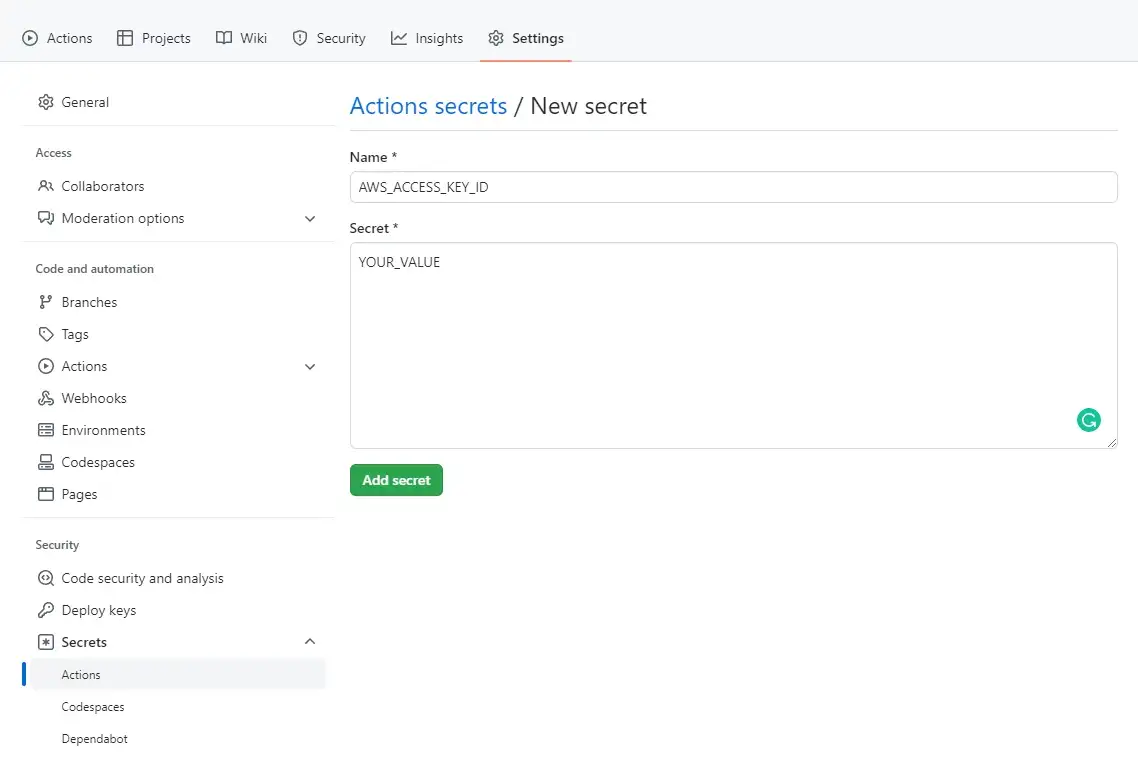
We start by adding secrets to our GitHub Repository.
On the repository page, click on Settings in the top navigation, then on Secrets,
Actions, then on the New repository secret button.
 Adding Secrets to GitHub repository
Then add each one by one.
Back in the code editor, In your root directory, we’ll create a .github directory, then a workflows directory inside, then a main.yml file (.github/workflows/main.yml)
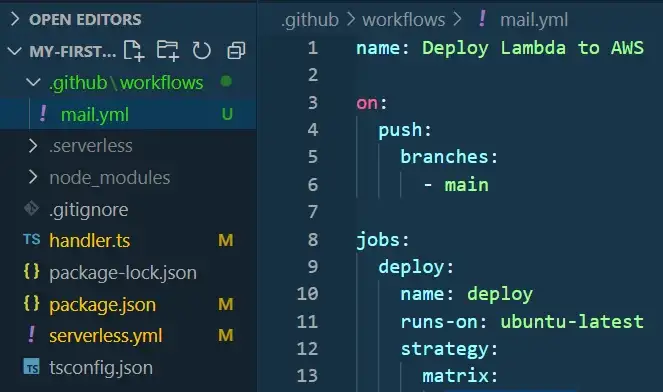 .github workflows main.yml file
We can find an example of the main.yml file on the Serverless GitHub Actions page.
It should look like this (with our AWS Serverless GitHub secrets set)
    name: Deploy Lambda to AWS

    on:
      push:
        branches:
          - main

    jobs:
      deploy:
        name:  deploy
        runs-on:  ubuntu-latest
        strategy:
          matrix:
            node-version: [16.x]
        steps:
          - uses:  actions/checkout@v3
          - name:  Use Node.js ${{ matrix.node-version }}
            uses:  actions/setup-node@v3
            with:
              node-version:  ${{ matrix.node-version }}
          - run:  npm ci  # install dependencies from package.json file
          - name:  serverless deploy
            uses:  serverless/[email protected]
            with:
              args:  deploy
            env:
              AWS_ACCESS_KEY_ID:  ${{ secrets.AWS_ACCESS_KEY_ID }} # picks from GitHub secrets
              AWS_SECRET_ACCESS_KEY:  ${{ secrets.AWS_SECRET_ACCESS_KEY }}
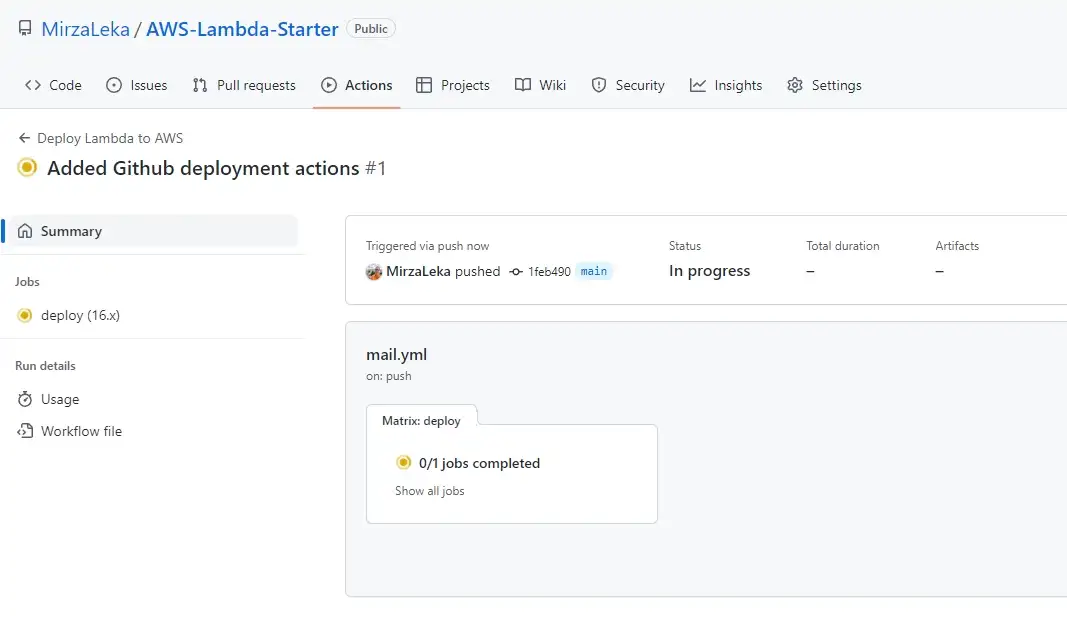
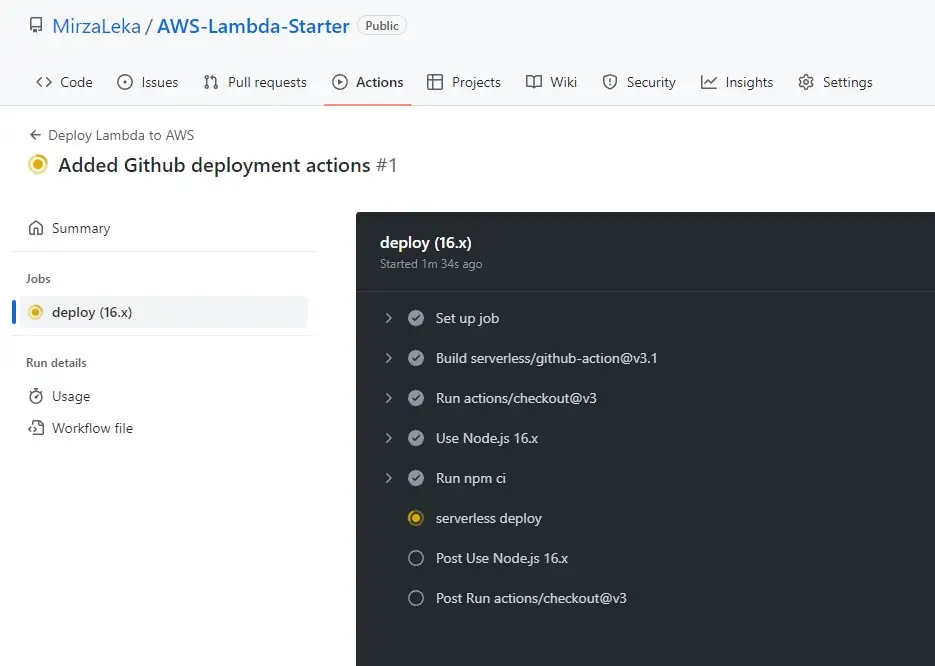
Now we stage these stages and push them to Git.
Upon pushing we should see a new job running under the Actions tab in the GitHub repository.
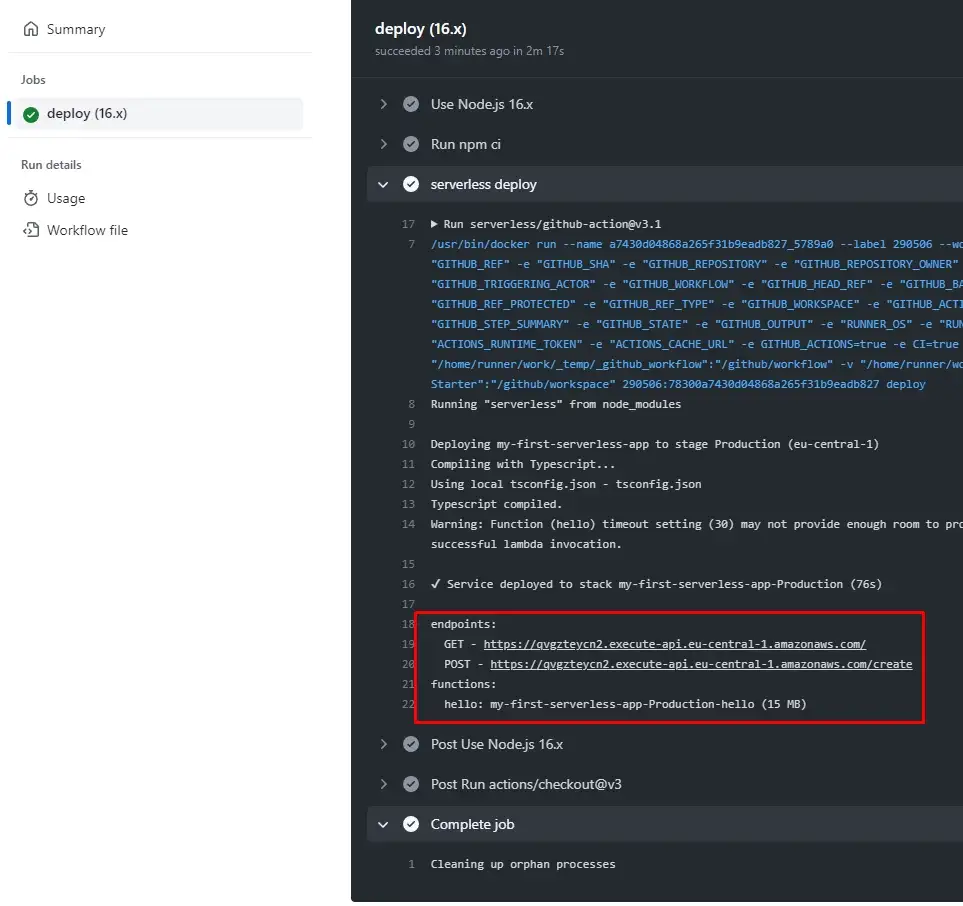
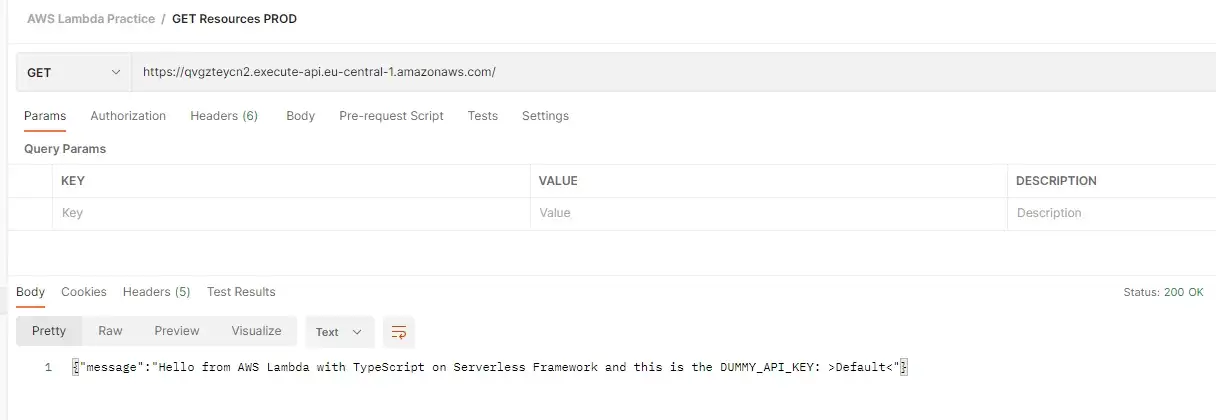 Testing function once again in production
. . .
 Photo by Steve Johnson from Pexels
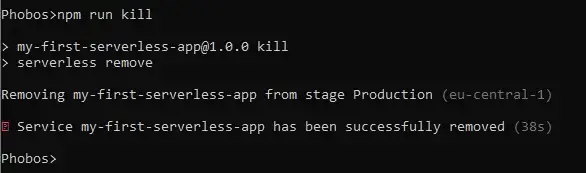 Removing function from AWS
Make sure to run this command for each stage (dev, production, etc.) You can build a new function just by redeploying the existing one.
. . .
. . .
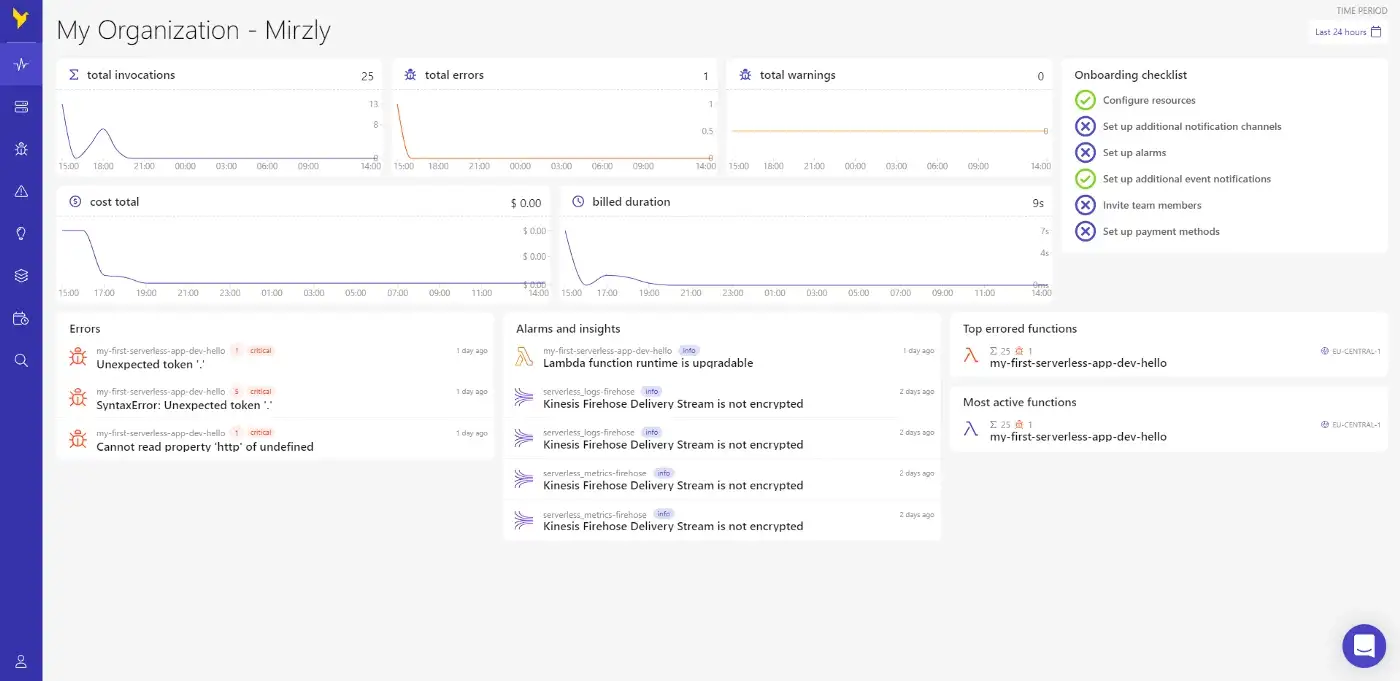 Dashbird Dashboard
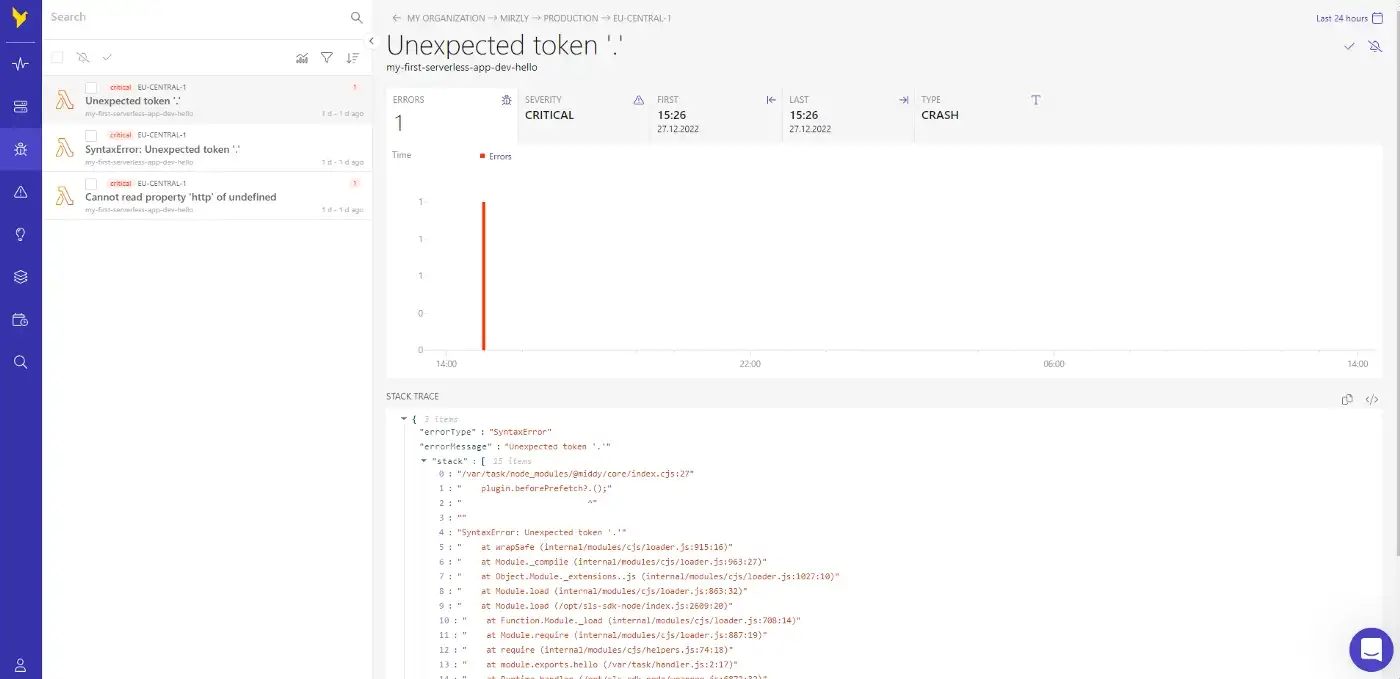 Peek into errors
Again, you can find the whole code on my AWS-Lambda-Starter repository.
Special thanks to my partner in crime Dzenan Dzafic.
Author: